Painted ceramic plates can look beautiful as wall art, display pieces, handmade gifts, holiday décor, or personalized keepsakes. But once the painting is done, one important step remains: protecting the design so it lasts. That is where sealing comes in. If you skip this stage, the paint may scratch, fade, smear, or wear away much faster than expected.
The best way to seal painted ceramic plates depends on one major question: is the plate decorative, or will it be used for food? Decorative plates are much easier to seal because you can choose from several common craft finishes. Plates intended for food use require much more caution, since many ordinary sealers are not made for direct food-contact surfaces.
This complete guide explains how to seal painted ceramic plates the right way. You will learn which sealers work best, how to prepare the plate, how to apply the finish without ruining the design, how long to let it cure, and what to avoid if you want a durable result.
Short Answer
To seal painted ceramic plates, let the paint dry fully, cure it first if the paint instructions require baking, then apply several thin coats of a clear sealer such as acrylic spray sealer, artist’s varnish, or resin for decorative use. If the plate will touch food, keep painted and sealed areas away from direct food-contact surfaces unless you are using products specifically made for that purpose.
Why Painted Ceramic Plates Need Sealing
Ceramic is a hard material, but paint sitting on ceramic is not automatically durable. Most painted finishes remain vulnerable unless they are cured and protected properly.
Sealing helps by:
- protecting the artwork from scratches
- reducing moisture damage
- helping prevent smudging and fading
- making decorative plates easier to dust and clean gently
- extending the life of the painted finish
- improving the final look with a gloss, satin, or matte finish
Even if a plate is only for display, it will still face dust, handling, and light exposure. A proper sealer helps preserve all the effort that went into painting it.
Decorative Plates vs Functional Plates
Before picking a sealer, decide how the plate will actually be used.
Decorative plates
These are meant for:
- wall hanging
- shelf display
- tabletop decoration
- seasonal décor
- personalized gifts
- memory pieces
These are the easiest to seal because durability matters, but food safety is not the main issue.
Functional plates
These are meant for:
- serving food
- everyday meals
- desserts or snacks
- occasional table use
This is where you need to be careful. Many common craft sealers are not intended for food-contact areas, even if they dry clear and hard.
That means the sealing method for a decorative plate is not automatically the right method for a plate you plan to eat from.
Can You Seal Painted Ceramic Plates for Food Use?
You can protect painted ceramic plates for limited practical use only if the painted and sealed areas stay away from where food, utensils, and lips touch. That usually means:
- painting the back of the plate only
- decorating the outer underside
- adding designs to the outer rim only if food will not touch that area
- keeping the eating surface plain
For most DIY projects, the safest rule is this: treat painted ceramic plates as decorative unless you are using products specifically intended for food-contact ceramic finishes.
Even when sealed, many craft-painted ceramic plates should be considered:
- hand-wash only
- display-first items
- not safe for knife and fork scraping
- not ideal for dishwashers or microwaves unless product instructions clearly allow it
Best Sealers for Painted Ceramic Plates
There is no single perfect sealer for every project. The best one depends on how the plate will be used and what kind of finish you want.
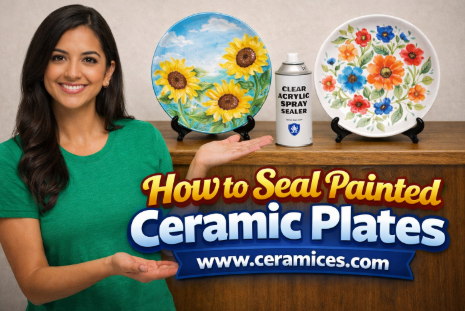
1. Acrylic spray sealer
This is one of the best and easiest choices for decorative plates. It goes on lightly, reduces brush marks, and works well for protecting painted designs.
Best for:
- wall plates
- gift plates
- display pieces
- light decorative handling
2. Artist’s clear varnish
A good-quality artist’s varnish can work well for painted ceramic surfaces, especially for decorative art plates. It is available in gloss, satin, and matte finishes.
Best for:
- hand-painted display plates
- detailed artwork
- decorative collections
3. Polycrylic-style clear topcoat
A water-based clear topcoat can work for decorative plates, especially when you want a durable clear finish without too much yellowing.
Best for:
- decorative plates
- painted plates with smooth surfaces
- craft projects needing a brush-on finish
4. Resin
Resin creates a thick, glossy, glass-like finish and is one of the most durable decorative options.
Best for:
- art plates
- display platters
- decorative statement pieces
- plates that will not be used for food
5. Bake-set ceramic or porcelain paint system
Some ceramic paints are designed to become more durable through oven curing. In some cases, that curing step is the main protection, though an extra non-food-contact decorative topcoat may still be added if desired.
Best for:
- ceramic paint projects
- porcelain paint designs
- baked decorative plate crafts
Best Paints to Use Before Sealing Ceramic Plates
The final result depends partly on the paint itself. Some paints bond much better to ceramic than others.
Acrylic craft paint
Easy to use and widely available, but it usually needs sealing for protection.
Enamel paint
Often more durable than ordinary acrylic and a good option for ceramic crafts.
Porcelain or ceramic paint
Made specifically for ceramic and porcelain surfaces, often the best choice for long-term decorative projects.
Paint pens for ceramic
Useful for lettering, details, and controlled designs. Many need baking or curing for best performance.
The better the paint adheres to the plate, the better the final sealed finish will hold up.
Before You Seal a Painted Ceramic Plate
Proper preparation makes a huge difference. Many sealing problems happen because people rush this part.
Let the paint dry fully
Do not seal over paint that is only surface-dry. Give it proper time.
Check the paint instructions
Some paints need baking first. Some do not.
Clean away dust and fingerprints
Use a soft lint-free cloth. Any debris left on the plate can get trapped under the sealer.
Choose your final finish
Decide whether you want:
- gloss for a bright ceramic shine
- satin for a softer finish
- matte for an artistic look
Test first if possible
If you have a spare ceramic item or hidden edge, test the sealer there first.
Step-by-Step: How to Seal Painted Ceramic Plates
Step 1: Let the Paint Dry Completely
This step is essential. Paint that looks dry may still be vulnerable underneath.
A safe approach is to let the plate dry longer than you think it needs, especially if:
- the paint was applied thickly
- you used multiple layers
- the room is humid
- the design includes metallic or dimensional paint
If the paint is not fully dry, the sealer may smear it or trap moisture under the finish.
Step 2: Cure the Paint if Required
If you used ceramic or porcelain paint that is designed to be heat set, follow the instructions before sealing.
This often involves:
- placing the plate in a cold oven
- heating to a specific temperature
- baking for a set time
- letting it cool gradually
Always follow the product directions rather than guessing. Correct curing can make the painted design much more durable.
Step 3: Choose the Right Sealer
Pick your sealer based on the plate’s purpose.
Use acrylic spray sealer if:
- the plate is decorative
- you want easy application
- you want to avoid brush marks
Use brush-on clear varnish if:
- you need more control
- the design is simple and stable
- you are comfortable applying smooth coats
Use resin if:
- the plate is for display only
- you want a glossy artistic finish
- you want stronger decorative protection
Step 4: Apply the First Coat Lightly
The first coat should be light, not heavy.
For spray sealer
Mist the surface lightly from the recommended distance. Do not soak the plate.
For brush-on sealer
Use a soft clean brush and apply a thin even layer with minimal back-and-forth brushing.
The first coat acts as a protective base. If you apply too much at once, you risk streaking, dripping, or disturbing the paint.
Step 5: Build Up Thin Coats
After the first coat dries, apply more thin coats.
In most cases, 2 to 4 light coats work better than one thick coat.
Between coats:
- let the surface dry as directed
- inspect for dust or uneven spots
- avoid touching the plate face directly
Thin layered sealing gives a smoother, cleaner, more durable finish.
Step 6: Let the Plate Cure Fully
This step matters just as much as application.
A plate may feel dry quickly, but full cure takes longer. During this time:
- do not stack the plate
- do not hang it immediately if the back might stick
- do not wash it
- do not wrap it tightly for gifting
The exact cure time depends on the product, but allowing extra time is almost always a good idea.
How to Seal Painted Ceramic Plates for Decorative Use
Decorative plates are the most straightforward projects.
A typical decorative sealing process looks like this:
- paint the plate
- let the design dry fully
- bake it if the paint requires heat setting
- apply 2 to 4 thin coats of spray sealer or varnish
- let the piece cure completely
- display it carefully
This method works well for:
- wall plates
- decorative platters
- souvenir plates
- personalized family plates
- holiday display pieces
How to Seal Painted Ceramic Plates With Resin
Resin gives a thick glossy finish and can make decorative plates look professional and high-end.
Benefits of resin
- very glossy appearance
- strong decorative protection
- deepens color beautifully
- adds a glass-like finish
Best for
- display plates
- art plates
- decorative serving platters not used for food
- gift pieces meant for viewing, not dining
Things to watch
- resin needs careful mixing
- dust control matters
- the plate must sit level while curing
- it is not the best choice for everyday stackable plate use
Resin is beautiful, but it is best for decorative projects rather than practical eating surfaces.
How to Seal Painted Ceramic Plates for Wall Display
Wall display plates are ideal for painted ceramic projects because they do not need to handle food, utensils, or frequent washing.
For wall plates:
- spray sealer is often enough
- gloss finish usually looks most ceramic-like
- a satin or matte finish can work for artistic designs
- make sure the plate is fully cured before attaching a hanger or display mount
If the plate will be hung in a bright room, a UV-resistant clear finish can help reduce fading.
How to Seal Painted Ceramic Plates for Limited Handling
Some painted plates are decorative but may still be handled occasionally for events, centerpieces, or seasonal decorating.
In these cases:
- use at least several thin coats of sealer
- allow full cure time
- avoid storing plates face-to-face without padding
- keep them hand-clean only, not heavily washed
This gives enough protection for display and light handling without pretending the plate is fully food-safe dinnerware.
How to Make the Finish Last Longer
Once the plate is sealed, good care will help a lot.
Keep it out of harsh sunlight
Strong sun can fade painted artwork over time.
Avoid soaking
Even decorative finishes can weaken with prolonged moisture.
Clean gently
Use a soft dry or slightly damp cloth only if needed.
Do not stack without protection
Put soft padding between plates.
Hand wash only if absolutely necessary
And only if the plate is decorative or the design is away from food-contact areas.
Store carefully
Wrap or cushion the plate if moving or storing it.
A sealed painted plate lasts much longer when treated like art.
Common Mistakes to Avoid
A few simple mistakes can ruin the final finish.
Sealing too soon
If the paint is not fully dry, the sealer can smear it.
Applying thick coats
Heavy coats often cause streaks, drips, and cloudiness.
Using regular craft sealer on eating surfaces
This is one of the biggest mistakes. Decorative safe is not the same as food safe.
Ignoring cure time
A surface that feels dry may still be soft underneath.
Brushing too aggressively
This can disturb hand-painted details.
Expecting dishwasher durability
Most DIY painted ceramic plate projects are not dishwasher-friendly.
Skipping test sprays
Some sealers change color slightly or alter sheen more than expected.
When You May Not Need an Extra Sealer
In some cases, you may not need a separate sealer at all.
This can happen if:
- you used a porcelain or ceramic paint specifically designed for oven curing
- the paint instructions say the cured finish is durable enough for decorative use
- the painted design is on the back or non-contact area of the plate
- you prefer the finish exactly as it looks after curing
Even then, added sealing may still help decorative pieces, but it is not always required if the paint system itself is made for ceramic durability.
Best Sealing Method by Plate Type
Decorative hand-painted wall plate
Use clear acrylic spray sealer or artist’s varnish.
Glossy showcase art plate
Use spray sealer first, then resin if you want a deep glossy finish.
Plate painted on the back only
Seal the painted back and leave the food side untouched.
Decorative holiday plate
Use several thin coats of spray sealer for easy protection.
Personalized keepsake plate
Use a durable decorative finish and store or display carefully.
Frequently Asked Questions
1. What is the best sealer for painted ceramic plates?
For decorative plates, acrylic spray sealer or artist’s varnish is often the best choice. Resin is excellent for highly glossy display pieces.
2. Can I use Mod Podge to seal painted ceramic plates?
You can use it for decorative craft purposes, but it is not usually the best finish for ceramic plates and is not ideal for direct food-contact areas.
3. Are sealed painted ceramic plates food safe?
Most ordinary craft sealers should not be assumed food safe for direct food-contact surfaces. Decorative use is the safer choice.
4. Can I put a sealed painted ceramic plate in the dishwasher?
Usually no. Painted and sealed ceramic plates are generally best treated as hand-wash only or decorative only.
5. Do I need to bake painted ceramic plates before sealing them?
Only if the paint you used is designed for baking or heat-setting. Follow the paint instructions first.
6. Can I seal acrylic paint on ceramic plates?
Yes, acrylic paint can be sealed on ceramic plates for decorative use with a clear sealer such as acrylic spray or varnish.
7. Is resin good for sealing painted ceramic plates?
Yes, resin is excellent for decorative plates when you want a glossy, durable art finish.
8. How many coats of sealer should I use?
Usually 2 to 4 thin coats work well for decorative plates, depending on the product and desired finish.
9. Why did my sealer make the paint streaky?
This usually happens when the paint was not fully dry, the first coat was too heavy, or the brush disturbed the design.
10. Can I use a painted ceramic plate for serving if the design is sealed?
Only if the painted and sealed areas stay away from where food, utensils, and lips will touch. Decorative use is still the safest option.
Conclusion
Learning how to seal painted ceramic plates is really about matching the right finish to the right purpose. If the plate is decorative, you have several good options, including acrylic spray sealer, artist’s varnish, and resin for a more dramatic glossy finish. If the plate is meant for food use, you need to be much more careful, because most common craft sealers are not intended for direct food-contact surfaces.
The best results come from a simple process: let the paint dry fully, cure it if required, apply thin even coats, and give the finish enough time to harden properly. Rushing this process is one of the main reasons painted ceramic projects fail.
When done well, sealing can help your painted ceramic plate stay vibrant, protected, and beautiful for a long time. Whether it becomes a display piece, a thoughtful handmade gift, or a personal keepsake, the right sealing method helps preserve the work and makes the finished plate look complete.