Transforming plain ceramic pots into vibrant pieces of art is a rewarding project that can enhance the beauty of your garden or indoor plant display. Whether you’re a seasoned DIY enthusiast or a beginner looking to add a personal touch to your plant containers, this guide on how to paint ceramic pots will provide you with step-by-step instructions, essential tips, and creative ideas to make your pottery stand out. Let’s dive into the colorful world of ceramic painting!
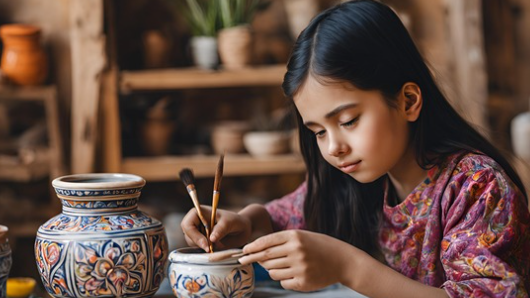
Table of Contents
- Why Paint Ceramic Pots?
- Materials You’ll Need
- Preparing Your Ceramic Pots
- Choosing the Right Paint and Tools
- Step-by-Step Guide to Painting Ceramic Pots
- [Step 1: Clean the Pot]
- [Step 2: Prime the Surface]
- [Step 3: Sketch Your Design]
- [Step 4: Apply Base Colors]
- [Step 5: Add Details and Patterns]
- [Step 6: Seal Your Artwork]
- Creative Design Ideas
- Tips for Long-Lasting Painted Pots
- Common Mistakes to Avoid
- Frequently Asked Questions
- Conclusion
Why Paint Ceramic Pots?
Painting ceramic pots is more than just a decorative activity; it’s an opportunity to personalize your living space and showcase your creativity. Here are some reasons why you should consider painting your ceramic pots:
- Customization: Tailor the design to match your home decor or garden theme.
- Upcycling: Revitalize old or plain pots, giving them a new lease on life.
- Therapeutic Activity: Engaging in creative projects can reduce stress and improve mental well-being.
- Gift Giving: Handmade painted pots make thoughtful and unique gifts for friends and family.
Materials You’ll Need
Before you start painting, gather all the necessary materials to ensure a smooth and enjoyable process:
- Ceramic Pots: Choose clean, dry pots. Porcelain or terracotta pots are ideal.
- Acrylic Paints: Specifically designed for ceramic surfaces.
- Paintbrushes: A variety of sizes, including fine-tip brushes for details.
- Painter’s Tape: To create clean lines and protect areas you don’t want to paint.
- Primer: Ensures better paint adhesion.
- Sealant: Protects your artwork from moisture and wear.
- Stencils or Templates (Optional): For intricate designs or patterns.
- Pencil or Chalk: For sketching your design.
- Clear Gloss or Matte Finish (Optional): Adds a protective layer and desired sheen.
- Palette or Mixing Tray: For mixing paint colors.
- Water Container and Paper Towels: For cleaning brushes between colors.
Preparing Your Ceramic Pots
Proper preparation is crucial for achieving a professional-looking finish. Follow these steps to prepare your ceramic pots:
- Clean Thoroughly: Wash the pots with warm, soapy water to remove any dirt, dust, or grease. Rinse well and let them dry completely.
- Sand the Surface (If Necessary): For glossy pots, lightly sand the surface with fine-grit sandpaper to create a rough texture, allowing the paint to adhere better.
- Tape Off Areas: Use painter’s tape to mask areas you want to keep paint-free or to create geometric patterns and lines.
Choosing the Right Paint and Tools
Selecting the appropriate materials is essential for durability and aesthetics:
- Acrylic Paints: These are versatile, water-based, and suitable for ceramic surfaces. They come in various finishes, including matte and glossy.
- Paintbrushes: Invest in high-quality brushes to ensure smooth application and precise detailing.
- Sealant: A clear acrylic sealer will protect your design from water damage and fading. Choose between matte, satin, or glossy finishes based on your preference.
- Stencil Tools: If you’re incorporating stencils, ensure they are clean and reusable for sharp designs.
Step-by-Step Guide to Painting Ceramic Pots
Follow these detailed steps to create stunning painted ceramic pots:
Step 1: Clean the Pot
Start by ensuring your ceramic pot is free from any residues:
- Wash the Pot: Use warm, soapy water to scrub the pot thoroughly.
- Rinse and Dry: Rinse off all soap and let the pot dry completely, preferably overnight.
Step 2: Prime the Surface
Priming helps the paint adhere better and enhances color vibrancy:
- Apply Primer: Use a ceramic or multi-surface primer. Apply a thin, even coat with a brush or spray primer.
- Let it Dry: Allow the primer to dry as per the manufacturer’s instructions, usually 24 hours.
Step 3: Sketch Your Design
Planning your design beforehand will lead to a more cohesive look:
- Draw Lightly: Use a pencil or chalk to sketch your design on the pot. Keep the design simple if you’re a beginner.
- Use Stencils: For intricate patterns, place stencils on the pot and secure them with tape.
Step 4: Apply Base Colors
Start with the broader areas before moving to details:
- Choose Your Colors: Select the main colors for your design.
- Paint Evenly: Apply the base colors using broad brush strokes. Let each color dry before applying the next to prevent smudging.
Step 5: Add Details and Patterns
Enhance your pot with finer details and textures:
- Use Fine Brushes: Switch to smaller brushes for detailed work.
- Layering: Apply multiple layers for depth and richness in color.
- Add Patterns: Incorporate patterns like stripes, polka dots, or floral designs for added interest.
Step 6: Seal Your Artwork
Protect your painted pot from the elements:
- Choose a Sealant: Select a clear acrylic sealer suitable for your desired finish.
- Apply Evenly: Spray or brush the sealant in thin, even coats, allowing each layer to dry thoroughly.
- Cure Time: Let the pot cure as per the sealant instructions before using it.
Creative Design Ideas
Unleash your creativity with these inspiring design ideas for painting ceramic pots:
1. Geometric Patterns
Use painter’s tape to create sharp lines and geometric shapes. Opt for contrasting colors to make the patterns pop.
2. Ombre Effect
Blend colors from light to dark or mix complementary colors for a stunning ombre look.
3. Nature-Inspired Designs
Incorporate elements like leaves, flowers, or vines for a natural and organic feel.
4. Abstract Art
Embrace abstract patterns and bold colors to create unique and eye-catching pots.
5. Decoupage
Use decorative paper or fabric pieces and seal them onto the pot for a textured and layered appearance.
6. Chalkboard Paint
Paint a section with chalkboard paint to allow for interchangeable messages or drawings.
Tips for Long-Lasting Painted Pots
Ensure your beautifully painted pots stay vibrant and intact for years to come with these tips:
- Use Quality Paints: Invest in high-quality acrylic paints for better coverage and durability.
- Proper Sealing: Always apply a good sealant to protect your artwork from moisture and UV rays.
- Avoid Excessive Water Exposure: Even with sealant, excessive water can wear down the paint over time. Consider using pots as decorative pieces rather than direct plant containers.
- Store Indoors During Harsh Weather: If your pots are outdoors, bring them inside during extreme weather to preserve the paint.
- Regular Maintenance: Touch up any chips or scratches promptly to prevent further damage.
Common Mistakes to Avoid
Steer clear of these common pitfalls to achieve professional-looking results:
- Skipping the Primer: Not priming can lead to poor paint adhesion and faded colors.
- Rushing the Drying Process: Allow each layer of paint and sealant to dry completely to avoid smudging and peeling.
- Using the Wrong Paint: Ensure you’re using paint suitable for ceramic surfaces to enhance longevity.
- Overloading with Paint: Apply thin, even coats instead of thick layers to prevent cracking and peeling.
- Ignoring Weather Conditions: For outdoor pots, paint in a dry, shaded area to prevent the paint from drying too quickly or fading under direct sunlight.
Frequently Asked Questions
1. Can I paint unglazed ceramic pots?
Yes, unglazed ceramic pots are ideal for painting as the porous surface allows paint to adhere better. However, ensure they are thoroughly cleaned and dry before starting.
2. What type of paint should I use for ceramic pots?
Acrylic paints are the best choice for painting ceramic pots. They are versatile, durable, and available in various finishes.
3. Do I need to bake painted ceramic pots for the paint to set?
Baking is not always necessary, especially if you use a proper sealant. However, some ceramic paints require baking to set the colors. Always follow the paint manufacturer’s instructions.
4. How can I make my painted pots waterproof?
Use a high-quality clear acrylic sealer to protect your design from moisture. For outdoor use, choose a sealant specifically designed for outdoor conditions.
5. Can I paint ceramic pots without a primer?
While it’s possible, using a primer significantly enhances paint adhesion and color vibrancy. Skipping the primer may result in a less durable finish.
6. How long does the paint take to dry on ceramic pots?
Drying times vary based on the type of paint and environmental conditions. Typically, acrylic paint dries to the touch within 1-2 hours, but it’s best to allow 24 hours before handling.
Conclusion
Painting ceramic pots is a delightful and creative way to personalize your plant containers, making them unique reflections of your style and personality. By following this comprehensive guide on how to paint ceramic pots, you can achieve professional-looking results that not only enhance your space but also provide a sense of accomplishment.
Remember to take your time with each step, from preparing the pot to sealing your artwork, and don’t be afraid to experiment with different designs and techniques. Whether you choose vibrant colors, intricate patterns, or minimalist designs, your painted ceramic pots will undoubtedly become a cherished addition to your home or garden.
So, gather your materials, unleash your creativity, and start transforming ordinary ceramic pots into extraordinary pieces of art today!