Ceramic wall tiles are a popular choice for kitchens, bathrooms, and other areas of the home due to their durability, ease of cleaning, and aesthetic appeal. However, over time, the color or design of your ceramic tiles may become outdated or worn and replacing them can be expensive and time-consuming. Fortunately, painting ceramic wall tiles is a cost-effective and creative way to give your space a fresh new look. In this guide, we’ll walk you through the entire process of painting ceramic wall tiles, from preparation to finishing touches, ensuring a professional and long-lasting result.
Why Paint Ceramic Wall Tiles?
Before diving into the process, it’s important to understand why painting ceramic tiles can be a great option:
- Cost-Effective: Painting is significantly cheaper than replacing tiles.
- Customizable: You can choose any color or finish to match your decor.
- Quick Update: A fresh coat of paint can transform a space in just a few days.
- Eco-Friendly: Repurposing existing tiles reduces waste.
However, painting ceramic tiles requires proper preparation and the right materials to ensure the paint adheres well and lasts for years.
Materials and Tools You’ll Need
Before starting, gather the following materials and tools:
- Paint: Use a high-quality tile paint or epoxy-based paint designed for ceramic surfaces.
- Primer: A bonding primer specifically for tiles is essential.
- Cleaning Supplies: Mild detergent, sponge, and a degreaser (if needed).
- Sandpaper: Fine-grit sandpaper (220-grit or higher).
- Painting Tools: Paintbrushes, foam rollers, or a paint sprayer.
- Painter’s Tape: To protect surrounding areas.
- Sealer: A clear, waterproof sealer to protect the painted surface.
- Drop Cloths: To protect floors and furniture.
- Safety Gear: Gloves, goggles, and a mask for sanding and painting.
Step-by-Step Guide to Painting Ceramic Wall Tiles
View Paint for Wall Tiles
Step 1: Prepare the Work Area
- Clear the Space: Remove any furniture, decor, or fixtures near the tiled area.
- Protect Surrounding Surfaces: Use painter’s tape to cover edges, countertops, and adjacent walls. Lay drop cloths on the floor to catch any paint drips.
- Ventilate the Area: Open windows or use a fan to ensure proper ventilation while working with paint and primer.
Step 2: Clean the Tiles Thoroughly
Proper cleaning is crucial for paint adhesion. Follow these steps:
- Wash the Tiles: Use a mild detergent and warm water to remove dirt, grease, and soap scum. For stubborn grime, use a degreaser.
- Rinse and Dry: Rinse the tiles with clean water and let them dry completely. Any moisture left on the surface can affect the paint’s ability to adhere.
- Inspect for Mold: If you notice mold or mildew, treat the area with a bleach solution or a commercial mold remover.
Step 3: Sand the Tiles
Sanding creates a rough surface that helps the primer and paint adhere better.
- Lightly Sand the Tiles: Use fine-grit sandpaper (220-grit or higher) to gently sand the tile surface. Focus on creating a slightly rough texture without damaging the tiles.
- Sand the Grout Lines: Lightly sand the grout lines to ensure even paint coverage.
- Wipe Away Dust: Use a damp cloth to remove all dust and debris from sanding.
Step 4: Apply Primer
Primer is essential for ensuring the paint sticks to the ceramic surface.
- Choose the Right Primer: Use a bonding primer specifically designed for tiles or glossy surfaces.
- Apply the Primer: Use a foam roller or brush to apply a thin, even coat of primer. Pay special attention to the grout lines.
- Let It Dry: Allow the primer to dry completely according to the manufacturer’s instructions (usually 24 hours).
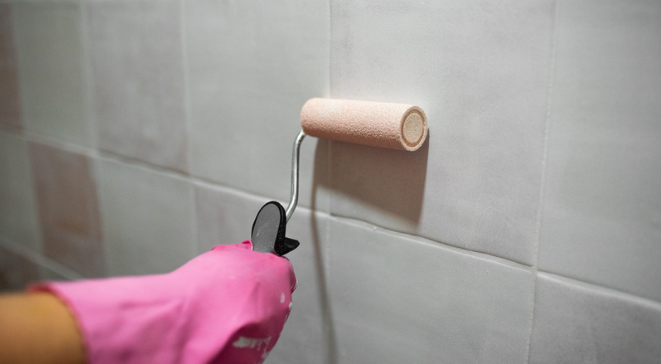
Step 5: Paint the Tiles
Now comes the fun part—painting!
- Choose the Right Paint: Use a high-quality tile paint or epoxy-based paint. These paints are durable and resistant to moisture, making them ideal for ceramic tiles.
- Apply the First Coat: Use a foam roller or brush to apply the first coat of paint. Work in small sections to ensure even coverage. Avoid overloading the brush or roller to prevent drips.
- Let It Dry: Allow the first coat to dry completely (check the paint can for drying times).
- Apply a Second Coat: Apply a second coat for full coverage and a professional finish. If needed, apply a third coat for darker or more vibrant colors.
Step 6: Seal the Painted Tiles
Sealing protects the painted surface from moisture, scratches, and wear.
- Choose a Sealer: Use a clear, waterproof sealer designed for painted surfaces.
- Apply the Sealer: Use a foam brush or roller to apply a thin, even coat of sealer. Be sure to cover the entire painted surface, including the grout lines.
- Let It Cure: Allow the sealer to cure completely (usually 24-48 hours) before using the tiled area.
Step 7: Reassemble the Space
Once the sealer has cured, you can:
- Remove Painter’s Tape: Carefully peel off the tape to reveal clean edges.
- Reinstall Fixtures: Reattach any fixtures or hardware you removed earlier.
- Clean Up: Dispose of drop cloths and clean your tools.
Tips for a Professional Finish
- Work in Small Sections: This helps you maintain control and avoid streaks or drips.
- Use High-Quality Products: Investing in good-quality paint, primer, and sealer will ensure a durable and long-lasting finish.
- Avoid Heavy Traffic: Allow the paint and sealer to cure fully before exposing the tiles to heavy use or moisture.
- Test First: If you’re unsure about the color or process, test it on a small, inconspicuous area first.
Maintenance of Painted Ceramic Tiles

To keep your painted tiles looking fresh:
- Clean Gently: Use a soft cloth or sponge and mild detergent to clean the surface. Avoid abrasive cleaners or scrubbing pads.
- Avoid Harsh Chemicals: Harsh chemicals can damage the paint and sealer.
- Reapply Sealer: Over time, the sealer may wear off. Reapply it every 1-2 years to maintain protection.
Common Mistakes to Avoid
- Skipping Primer: Primer is essential for paint adhesion. Skipping this step can lead to peeling or chipping.
- Rushing the Process: Allow adequate drying and curing time between each step to ensure a durable finish.
- Using the Wrong Paint: Regular wall paint is not suitable for tiles. Always use paint designed for ceramic or high-moisture areas.
Frequently Asked Questions
1. Can I paint over glossy ceramic tiles?
Yes, but you must sand the tiles and use a bonding primer to ensure the paint adheres properly.
2. How long will painted ceramic tiles last?
With proper preparation and sealing, painted tiles can last 5-10 years or longer, depending on usage and maintenance.
3. Can I paint over cracked or damaged tiles?
It’s best to repair or replace damaged tiles before painting. Paint will not fix cracks or chips.
4. Is it safe to paint tiles in a shower or wet area?
Yes, but you must use waterproof paint and sealer and ensure the area is well-ventilated during application.
Conclusion
Painting ceramic wall tiles is a budget-friendly and creative way to update your home’s look. By following the steps outlined in this guide, you can achieve a professional and durable finish that transforms your space. Remember to take your time, use the right materials, and prioritize proper preparation and sealing. With a little effort, you can enjoy beautiful, custom-painted tiles for years to come.
Whether you’re refreshing a bathroom, updating a kitchen backsplash, or adding a pop of color to a feature wall, painting ceramic tiles is a rewarding DIY project that delivers impressive results. So, grab your tools, choose your favorite color, and get started on your tile-painting journey today!