Cutting ceramic tile can be the trickiest part of any tiling project. Whether you’re remodeling a bathroom, installing a backsplash, or laying new flooring, the precision of your tile cuts determines the overall finish of your work. Uneven or jagged cuts can ruin an otherwise perfect installation, which is why choosing the best tool to cut ceramic tile is so important.
From manual tile cutters for straight cuts to wet saws for professional precision and tile nippers for tricky shapes, there’s a tool designed for every job. The right choice depends on the type of cuts you need, the size of your project, and your budget.
This buying guide will help you understand the different types of tile-cutting tools, their strengths and weaknesses, and how to pick the best one for your DIY or professional tiling project.
Buying Guide: How to Choose the Best Tool to Cut Ceramic Tile

1. Consider Your Project Size
- Small projects (backsplashes, repairs): A simple manual cutter or tile nipper may be enough.
- Medium projects (bathrooms, kitchens): A high-quality manual tile cutter or a snap cutter is best for consistent straight cuts.
- Large projects (flooring, walls, professional use): A wet saw offers the best speed, precision, and versatility.
2. Types of Tile Cutting Tools
- Manual Tile Cutter: Great for straight cuts. Affordable, lightweight, and ideal for beginners.
- Tile Nippers: Perfect for irregular cuts, corners, or shapes around pipes and fixtures. Best for small, detailed jobs.
- Wet Saw: Professional-grade tool using a water-cooled diamond blade for smooth, precise cuts. Ideal for large or thick tiles.
- Angle Grinder with Diamond Blade: Best for curved cuts and versatility but requires a steady hand.
- Rotary Tool with Tile Cutting Bit: Good for small, detailed, or custom shapes.
3. Ease of Use
If you’re a beginner, look for tools that are simple and forgiving, such as a manual tile cutter. Professionals may prefer a wet saw for accuracy and efficiency.
4. Precision and Cut Quality
- For clean, straight lines → Manual cutter or wet saw.
- For curves, notches, or irregular cuts → Tile nippers or angle grinder.
- For decorative designs → Rotary tools with special bits.
5. Portability and Storage
Manual cutters and nippers are compact and easy to store. Wet saws and grinders are bulkier but offer superior cutting ability.
6. Budget Considerations
- Budget-friendly: Tile nippers or basic manual cutters.
- Mid-range: High-quality manual cutters with scoring wheels.
- Premium: Wet saws for serious DIYers or professionals.
7. Safety
Choose a tool that offers good grip, stability, and blade protection. Wet saws reduce dust but require water handling, while angle grinders create more dust and need extra protective gear.
✅ Pro Tip: For the smoothest results, always use a diamond-tipped blade or wheel when cutting ceramic tile, regardless of the tool you choose.
1. Manual/Lever Tile Cutter (e.g. 24-inch or 36-inch tile cutter)
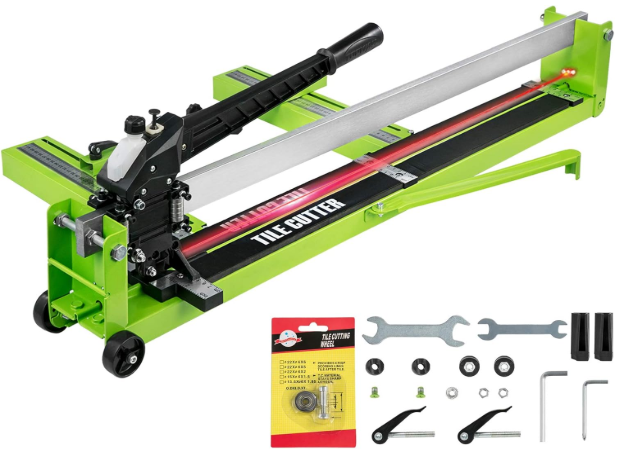
Product Description:
A manual lever tile cutter uses a scoring wheel to scratch a line on the ceramic tile, then a lever/presser foot applies pressure to snap the tile cleanly along the score. Large size (24-36″) allows cutting big tiles (floor, wall) without using a saw. No electricity needed. Very useful for straight cuts.
Key Features:
- Long base/bed to support large tiles.
- Hardened steel scoring wheel (replaceable).
- Adjustable fence/guide to help align cuts.
- Sturdy rails or guides to ensure straight, consistent scoring and snapping.
- Rubber or padded feet to reduce slippage/damage.
Pros:
- Clean straight cuts without dust or water mess.
- Low maintenance and relatively simple operation.
- No power required, so safer, quieter, and portable.
- Reasonably accurate for straight cuts.
Cons:
- Doesn’t do curved cuts, L-shapes, or small detailed cuts.
- Quality of snapping depends on scoring; poor scoring or alignment leads to chips.
- Large models can be bulky and hard to store.
- Expensive units cost a lot; cheaper versions may not deliver clean breaks.
Recommendation:
If you have lots of large ceramic tiles to cut (floor or wall), and many straight cuts, this is highly valuable. Pick a model with a sturdy scoring wheel, strong rails, and good support. If your project only has a few cuts or odd shapes, this might be overkill.
2. Wet Saw with Diamond Blade
Product Description:
A wet saw is a powered tool with a diamond-tipped blade cooled by water. It allows you to make precise, clean, and oftentimes curved or mitered cuts in ceramic tile, even thick or large pieces. Great for professional or heavy DIY jobs.
Key Features:
- Diamond blade (often segmented or continuous rim) with enough diameter to handle large tiles.
- Water reservoir/pump to cool the blade and reduce dust.
- Adjustable fence or sliding table to guide the tile.
- Rubbery or anti-slip table surface.
- Angle guides for bevel or miter cuts.
Pros:
- Very clean cuts, less chipping.
- Can handle thick tiles and large sizes.
- Can make angled, curved, or notched cuts.
- Faster cuts for big jobs.
Cons:
- Expensive compared to manual cutter or nippers.
- Bulky; takes space and requires water hookup or cleanup.
- Safety hazards: power tool, blade exposure, water + electricity, so needs careful handling.
- Maintenance of pump, blade, water management can be a pain.
Recommendation:
If you frequently install tile, have large‐format tiles, or want precision (like in kitchen backsplash, shower, patios), wet saw is often the best tool. Go for a model with good blade quality and safety features.
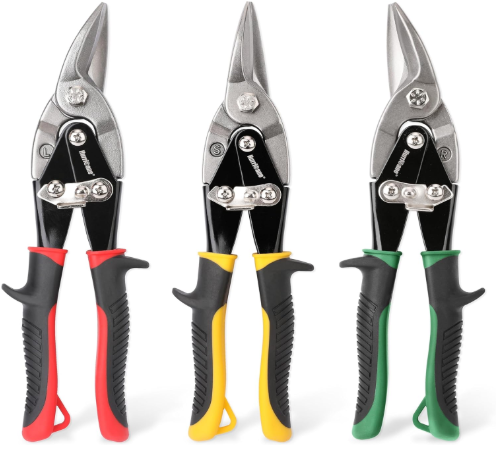
3. Tile Nippers / Tile Cutter Pliers
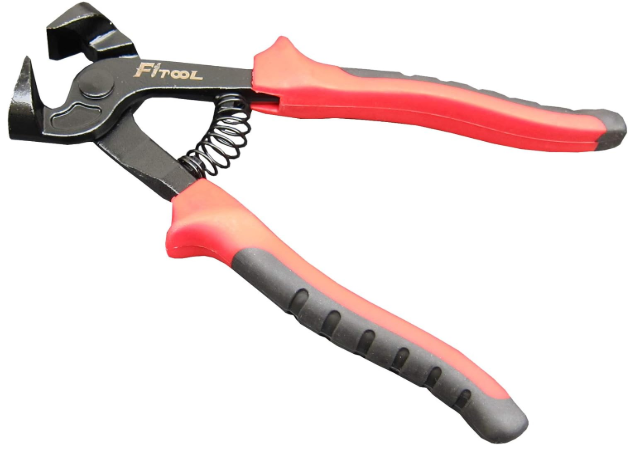
Product Description:
A tile nipper (or tile cutting pliers) is a hand tool for breaking off small sections of tile, especially curved edges or notches around fixtures. It has a sharp hardened jaw that “nips” tile after scoring or marking.
Key Features:
- Hardened, replaceable jaws.
- Comfortable grip handles with sufficient leverage.
- Small size so you have control.
- Possibly spring-loaded or cushioned handles for comfort.
Pros:
- Ideal for small, irregular cuts (around pipes, outlets, curves).
- Portable, inexpensive.
- No power required.
- Can do curved/narrow cuts that saws/cutters can’t.
Cons:
- Edge chips are common if not used carefully.
- Difficult to get perfect curves; not precise for large straight lines.
- Tiring on hands for many cuts.
- Tile thickness must be modest; very thick tiles hard to nip.
Recommendation:
Keep a high-quality tile nipper around for detail work. Even if you use a big saw or cutter, sometimes you’ll need a nipper to finish an odd shape.
4. Angle Grinder with Diamond Blade
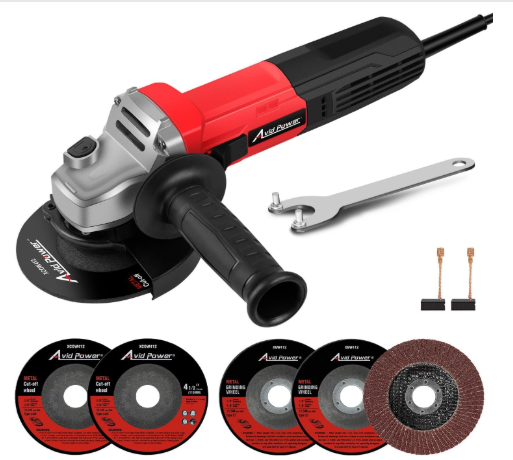
Product Description:
An angle grinder fitted with a diamond blade disk designed for tile cutting can make straight cuts, curves, notches, and holes. Useful when you need flexibility and are working with awkward cuts.
Key Features:
- High-RPM motor with enough power.
- Diamond “wet/dry” blade suitable for ceramic.
- Adjustable guard to protect user and surroundings.
- Comfortable grip; preferably side handle for control.
- Optional water cooling or splash guard to reduce dust.
Pros:
- Very versatile; can reach places saws/cutters can’t.
- Good for plunge cuts, curves, notches.
- Portable, relatively affordable.
Cons:
- High chance of chipping if blade or technique is not right.
- Dust and debris; safety gear required.
- Harder to make long straight cuts consistent.
- Blade edges wear; diamond disks can be expensive to replace.
Recommendation:
Great as a supplementary tool for odd or custom cuts, especially in tight spots or for curves. But for primary straight-cut jobs, it’s often less ideal than a saw or long manual cutter.
5. Snap Cutter / Scoring Cutter
Product Description:
Snap cutters are simpler, smaller units than full manual lever cutters. You score the tile with a wheel, then manually snap along the score line. Great for thinner ceramic tiles, backsplash, wall tile, or smaller floors.
Key Features:
- Scoring wheel (often carbide or tungsten).
- Base support rails or guides.
- Snap pad or foot that applies controlled pressure to break along the score.
- Comfortable handle and non-slip base.
Pros:
- Compact, easy to store.
- Clean straight cuts for thinner tiles.
- No electricity, low mess.
- Affordable.
Cons:
- Doesn’t handle thick or large tiles well.
- Curved or complex shapes beyond its capability.
- Requires careful scoring; mistakes lead to chips or cracks.
Recommendation:
For homeowners or DIYers doing backsplashes, smaller walls, or occasional flooring, a good snap cutter is often a best value. Get one with a strong score wheel and a stable base.
6. Rotary / Roto-Saw / Carbide Tile Cutting Bit Tools

Product Description:
Rotary tools with appropriate bits (e.g., carbide or diamond bits) allow you to cut or shape ceramic tile in detail: holes, curves, decorative edges. These are small tools good for fine work rather than large area cutting.
Key Features:
- Rotary tool (variable speed often best).
- Tile-dedicated cutting bit or wheel.
- Good dust collection or shield guard.
- Comfortable grip and steady control.
Pros:
- Excellent for detailed work and custom shapes.
- Lightweight and portable.
- Precise when used carefully.
Cons:
- Very slow for large cuts.
- Higher risk of breakage or chips if not careful.
- Bits wear out; need replacement.
- Can be tricky for beginners.
Recommendation:
Use this tool for detail finishing — for example around sinks, corners, or decorative inlays. It’s not usually the main tool for large jobs, but extremely useful for precision.
Overall Recommendations & What to Look for in a Product
When choosing among actual models (on Amazon or elsewhere), check for:
- Blade or scoring wheel quality (diamond, hardened steel).
- Size of the tile it supports, especially bed length or saw capacity.
- Safety features (guards, water cooling, splash protection).
- User comfort (ergonomic handles, side grips, stable bases).
- Durability of parts (replaceable wheels, jaws, blades).
- Accessories included (angle guides, fences, measuring scales).
How to Use Ceramic Tile Cutting Tools
Each tile cutting tool has its own technique. Here’s a quick step-by-step for the most common ones:
1. Manual Tile Cutter (Snap Cutter)
- Measure and mark the cut line on the tile with a pencil or marker.
- Place the tile on the cutter bed, aligning the mark with the scoring wheel.
- Score the tile once, firmly and evenly, by pushing the handle across.
- Apply pressure with the handle to snap the tile along the scored line.
✅ Best for: Straight cuts on small to medium ceramic tiles.
2. Wet Saw
- Fill the reservoir with clean water to keep the blade cool.
- Place the tile on the saw table, aligning it with the blade and fence.
- Turn on the saw and slowly guide the tile through the blade.
- Keep your hands away from the blade and use even pressure.
✅ Best for: Large projects, thick tiles, and precision cuts.
3. Tile Nippers
- Mark the section of tile you want to remove.
- Hold the tile firmly in one hand and the nippers in the other.
- Nip off small pieces gradually, instead of trying to cut it all at once.
- Smooth edges with a file or sandpaper if needed.
✅ Best for: Irregular cuts around fixtures or curved shapes.
4. Angle Grinder with Diamond Blade
- Mark the cut line with a grease pencil or marker.
- Secure the tile on a workbench with clamps.
- Hold the grinder firmly with both hands and slowly cut along the line.
- Move steadily to avoid chipping and wear protective gear.
✅ Best for: Curves, notches, or custom cuts.
5. Rotary Tool (with Tile Cutting Bit)
- Install a tile-cutting bit or wheel on your rotary tool.
- Mark the cut line on your tile.
- Hold the tool like a pen and carefully follow the line.
- Work slowly to avoid overheating the bit.
✅ Best for: Small details, holes, or decorative designs.
Safety Guide for Cutting Ceramic Tile
Working with ceramic tiles and cutting tools can be risky if precautions aren’t taken. Follow these safety tips every time:
1. Wear Protective Gear
- Safety goggles to prevent shards from hitting your eyes.
- Gloves to protect against sharp tile edges.
- Dust mask when using dry tools like angle grinders.
- Hearing protection when using loud power tools.
2. Work in a Safe Environment
- Always work on a stable surface with enough space.
- Use clamps to hold tiles in place to prevent slipping.
- Keep water away from electrical outlets when using wet saws.
3. Handle Tools Properly
- Never force a tool; let the blade or wheel do the work.
- Keep fingers away from cutting paths.
- Lift heavy tools carefully and set them down gently.
4. Maintain Your Tools
- Replace worn-out blades, bits, or scoring wheels regularly.
- Keep wet saw reservoirs clean to prevent clogging.
- Inspect electrical cords for damage before use.
5. Tile Handling Safety
- Avoid dragging tiles across each other to reduce chips.
- Smooth rough edges with sandpaper or a rubbing stone.
- Dispose of broken tile pieces carefully—they can be razor-sharp.
✅ Pro Tip: Always cut a test tile first when using a new tool. This helps you adjust pressure, speed, and technique before working on your main tiles.
Frequently Asked Questions (FAQs)
1. What is the easiest tool to cut ceramic tile for beginners?
A manual tile cutter (snap cutter) is the easiest and most beginner-friendly tool. It’s simple to use, safe, and produces clean straight cuts without electricity or water.
2. Can I use a regular saw blade to cut ceramic tile?
No. Regular saw blades will not cut ceramic and may damage both the blade and the tile. You need a diamond-tipped blade specifically designed for ceramic or porcelain.
3. Do I need a wet saw for every tile project?
Not necessarily. A wet saw is best for large projects, thick tiles, or when precision is crucial. For small projects or straight cuts, a manual cutter or nippers may be enough.
4. Can I cut curves in ceramic tile?
Yes. Curves can’t be done with a manual cutter. Instead, use tile nippers, an angle grinder with a diamond blade, or a rotary tool to achieve curved or custom shapes.
5. Are angle grinders safe to use for cutting tiles?
They are safe if handled properly, but they produce a lot of dust and sparks. Always wear protective gear and secure your tile before cutting. For beginners, manual cutters or wet saws are safer.
6. Do thicker tiles need different tools?
Yes. Thicker or harder tiles (like porcelain) are more difficult to snap with manual cutters. A wet saw with a diamond blade is usually recommended for clean results on thicker tiles.
7. Can ceramic tiles crack while cutting?
Yes, especially if not scored correctly or if too much pressure is applied. To avoid cracking, always score once with even pressure and let the tool (blade or wheel) do the work.
Conclusion
Cutting ceramic tile doesn’t have to be intimidating if you choose the right tool for your project. Each tool has its strengths:
- Manual tile cutters are budget-friendly and perfect for straight cuts.
- Tile nippers are ideal for small, irregular shapes and curved edges.
- Wet saws deliver professional-level precision for larger projects and tough tiles.
- Angle grinders and rotary tools provide flexibility for custom cuts and designs.
The best tool to cut ceramic tile depends on your project size, tile thickness, and the type of cuts you need. If you’re a DIY beginner handling a small backsplash, a manual cutter and nippers may be all you need. For larger floors or bathroom remodels, investing in a wet saw ensures accuracy and efficiency.
✅ Bottom line: Choose a tool that matches your skill level, project requirements, and budget. With the right tool and proper safety precautions, you can achieve clean, professional-looking cuts and a polished finish to your tile project.