Tearing up a ceramic tile floor might sound like a dusty, back-breaking nightmare, but with the right tools, strategy, and patience, it’s completely manageable — even for first-time DIYers. Whether you’re prepping for sleek new hardwood, modern vinyl planks, or just replacing cracked and outdated tiles, knowing how to tear up ceramic tile floor the right way will save you time, energy, and frustration.
Ceramic tile is durable and built to last — which means it won’t give up easily. But with a step-by-step approach and a few pro techniques, you can lift tiles efficiently, minimize damage to the subfloor, and leave behind a clean, ready-to-renovate surface. Let’s break it down in detail.
Understanding What You’re Up Against
Before you dive in with a hammer and chisel, it’s important to understand how ceramic tile is installed.
Ceramic tiles are typically:
- Set in thinset mortar (a cement-based adhesive) or occasionally mastic (a softer adhesive for wall tiles).
- Grouted at the joints, which hardens into cement-like lines between tiles.
- Often installed over a cement backer board, concrete slab, or plywood subfloor.
That combination — tile + mortar + grout + underlayment — is what makes ceramic floors so solid and long-lasting. Unfortunately, that same structure makes removal a bit labor-intensive.
Knowing what’s underneath helps you plan your removal process, choose the right tools, and avoid damaging your foundation.
Signs It’s Time to Tear Up a Ceramic Tile Floor
Ceramic floors can last decades, but sometimes removal is inevitable. Common reasons include:
- Cracked or loose tiles — often due to foundation shifts or moisture.
- Outdated design — that 1990s beige or floral pattern has overstayed its welcome.
- Water damage — leading to mold or softened subflooring.
- Remodeling projects — changing layouts or upgrading to new flooring.
- Uneven surfaces — caused by improper installation or years of wear.
If your tiles are uneven, lifting, or you’re noticing hollow sounds when walking across them, that’s your sign: it’s time to tear up the ceramic tile floor and start fresh.
What You’ll Need: Tools and Materials
Having the right tools is half the battle. While you can technically tear up tile with just a hammer and chisel, it’s a lot easier — and cleaner — with the right setup.
Essential Tools:
- Hammer and Cold Chisel – for loosening tiles manually.
- Floor Scraper or Pry Bar – for prying up large sections.
- Rotary Hammer with a Chisel Attachment – for power removal.
- Utility Knife – to cut through grout or caulking lines.
- Putty Knife or Small Scraper – for delicate areas.
- Buckets and Trash Bags – for debris collection.
- Shop Vacuum – for cleaning dust and small chips.
Safety Gear:
- Safety Glasses – flying shards are sharp and unpredictable.
- Gloves – protect against cuts from broken tiles.
- Dust Mask or Respirator – ceramic dust can be harmful when inhaled.
- Knee Pads – a must-have for comfort and safety.
- Ear Protection – power tools get loud, especially indoors.
Optional but Helpful:
- Oscillating Multi-Tool – for cutting through underlayment or trim.
- Heat Gun – to soften old adhesive in stubborn spots.
- Wheelbarrow – for hauling heavy tile debris outside.
Preparation: The Secret to a Cleaner, Faster Tile Removal
Preparation may not be the most exciting part, but it’s the step that saves you the most cleanup later.
1. Clear the Room
Remove all furniture, rugs, and appliances. Anything left behind will collect dust or get damaged.
2. Protect Adjacent Areas
Ceramic removal creates dust — lots of it. Seal doorways with plastic sheeting and painter’s tape. Cover vents to keep dust out of your HVAC system.
3. Remove Baseboards and Trim
Use a pry bar or putty knife to gently remove baseboards. Label them if you plan to reuse them. This gives you easier access to the tile edges.
4. Inspect the Subfloor Type
Peek under a loose or edge tile. Are you looking at concrete, cement board, or plywood?
Knowing this will tell you whether you’ll need extra steps after removal — like replacing backer board or patching concrete.
5. Score the Grout Lines (Optional)
Cutting along grout lines with a utility knife can help weaken the tile bond and minimize flying shards during removal.
Step-by-Step: How to Tear Up Ceramic Tile Floor Like a Pro
Now for the real work. Here’s how to tackle ceramic tile removal efficiently and safely.
Step 1: Find a Starting Point
The first tile is always the hardest. Look for:
- A broken or loose tile (the ideal place to start).
- Or start at the edge of the floor or a transition strip where tile meets another flooring type.
If no tiles are loose, break one deliberately using a hammer and chisel — strike near a grout line to avoid unnecessary shattering.
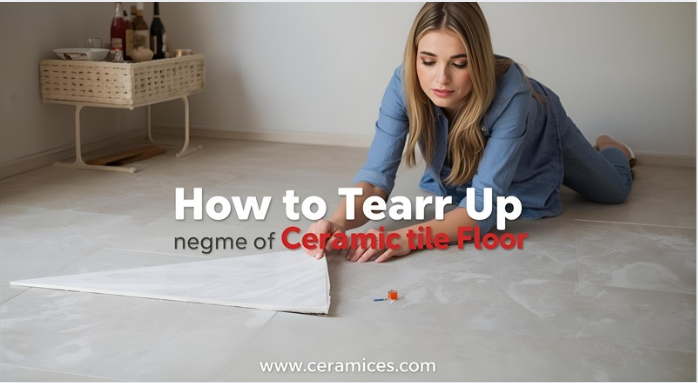
Step 2: Lift the First Tile
Once you’ve cracked the first piece:
- Wedge the chisel under one edge.
- Tap gently with a hammer until it slides beneath the tile.
- Pry upward until the tile pops loose.
You might hear satisfying “pops” as the adhesive bond breaks. Be cautious — ceramic shards can be razor-sharp.
Step 3: Continue Across the Floor
After removing the first tile, work methodically across the floor:
- Use your chisel and hammer or floor scraper at a shallow angle.
- Keep pressure consistent.
- Remove tiles one section (about 2–3 square feet) at a time.
If you’re tackling a large room, alternate between manual removal and a rotary hammer with a chisel bit for faster progress.
Pro Tip: Power tools make quick work of removal, but they can gouge your subfloor if you’re not careful. Keep the blade flat and avoid digging too deep.
Step 4: Remove the Mortar or Thinset
Once the tiles are gone, you’ll face another challenge — the thinset mortar left behind. This gray, rock-hard layer must be removed before new flooring can be installed.
Options include:
- Manual scraping with a heavy-duty floor scraper (slow but safe).
- Power chipping using a rotary hammer and wide chisel bit (fastest).
- Grinding with an angle grinder and diamond cup wheel (best for concrete subfloors).
Vacuum frequently to keep dust under control, and wear a respirator during this step — mortar dust is fine and abrasive.
Step 5: Inspect the Subfloor
Once all adhesive is gone, inspect your subfloor for:
- Cracks or chips (common on concrete).
- Loose screws or nails (if it’s wood).
- Water damage (especially near bathrooms or kitchens).
Repair any issues before laying new flooring. This ensures a solid foundation and prevents future problems like squeaks or uneven spots.
Step 6: Dispose of Debris Properly
Tile debris adds up fast. Ceramic is heavy, so avoid overloading trash bags — they’ll tear easily.
Instead:
- Use contractor-grade bags or 5-gallon buckets.
- Rent a dump trailer or dumpster if you’re removing tile from multiple rooms.
- Check local regulations — some waste facilities have specific rules for construction debris.
Tips from Flooring Experts: Tear-Up Without the Headache
Even pros admit that removing ceramic tile is labor-intensive. But these insider tricks make the process cleaner, faster, and safer.
1. Keep Your Work Area Damp
A light mist of water from a spray bottle keeps dust down. Don’t soak the floor — just dampen it slightly before and during removal.
2. Work in Sections
Tackle 2–3 square feet at a time. This helps you stay focused and prevents you from creating a massive pile of rubble too early.
3. Take Breaks — Seriously
Tile removal is physically demanding. Take short breaks to stretch and stay hydrated. Rushing leads to mistakes (and sore muscles).
4. Replace Dull Tools
A dull scraper or worn-out chisel slows you down and increases the risk of damaging the subfloor. Keep spares handy.
5. Protect Nearby Walls and Cabinets
Ceramic shards can fly. Use cardboard shields or drop cloths to protect surrounding surfaces — especially in kitchens and bathrooms.
6. Know When to Use Power Tools
Manual methods work great for small spaces. For large rooms or tile bonded with strong mortar, a rotary hammer or tile removal machine saves hours of effort.
7. Remove Grout First (Optional)
Some pros remove grout lines first with an oscillating tool or grout saw. This can make lifting tiles easier and reduce chipping along edges.
Removing Tile from Different Subfloors
Not all tile floors are built the same. How you remove them depends on what lies underneath.
1. Ceramic Tile on Concrete Slab
This is the most common in basements, bathrooms, and kitchens.
Here’s what to know:
- Tiles are usually set directly in thinset mortar.
- Removal can be done with a rotary hammer or floor chisel.
- After tile removal, grind away residual mortar with an angle grinder for a smooth finish.
Pro Tip: Be careful not to gouge the concrete surface. Any deep marks will need patching before installing new flooring.
2. Ceramic Tile on Cement Backer Board
Found in kitchens, bathrooms, and laundry rooms.
- Tiles are bonded to cement board (like HardieBacker or Durock).
- The cement board itself may need to be removed if damaged.
- To remove, unscrew or pry up the panels after taking out the tiles.
This can expose the plywood beneath, which should be cleaned, inspected, and possibly replaced if moisture-damaged.
3. Ceramic Tile on Plywood or Wood Subfloor
Less common but found in older homes.
- Tiles are attached using thinset or adhesive directly onto plywood.
- Removal must be done carefully to avoid gouging the wood.
- Once tiles are gone, sand down any high spots and patch imperfections.
Note: If you plan to install new tile afterward, consider replacing plywood with cement backer board for better stability and moisture resistance.
How to Tear Up Ceramic Tile in Specific Rooms
Different rooms have unique challenges based on size, moisture, and furniture layout.
Bathroom
Bathrooms are tight spaces, often with fixtures to work around.
- Use small hand tools for corners and around toilets.
- Cover tubs and sinks to prevent chips from scratching surfaces.
- Watch out for plumbing lines beneath the floor.
Kitchen
Kitchens often have cabinets installed after tile installation.
- You’ll need to chip carefully along toe-kicks and appliance spaces.
- If tiles run under cabinets, stop at the cabinet line unless you’re replacing everything.
Entryway or Hallway
These high-traffic areas are usually set on concrete.
- Power tools are your friend here.
- Be sure to tape off adjoining rooms to limit dust spread.
Dealing with Stubborn Adhesive and Mortar
Sometimes, even after all the tiles are gone, the floor remains uneven and rough. That’s likely due to leftover mortar or adhesive.
Here’s how to clean it up:
- Chisel Off the Bulk: Use a floor scraper to remove large chunks.
- Grind the Surface: An angle grinder with a diamond cup wheel works wonders on concrete.
- Vacuum Thoroughly: Remove all dust and residue.
- Smooth the Surface: Apply a self-leveling compound if necessary to even out low spots.
The goal is to end up with a smooth, solid surface — ready for your next flooring installation.
Common Mistakes to Avoid When Tearing Up Ceramic Tile
Even well-meaning DIYers can run into issues. Avoid these common pitfalls:
- Skipping Safety Gear: Flying tile shards can cause serious injury. Always wear protective glasses and gloves.
- Working Too Fast: Impatience causes cracks in subfloors and tool damage.
- Ignoring Dust Control: Fine ceramic dust travels everywhere — close vents and seal off rooms.
- Forgetting Disposal Plans: Tiles are heavy; make sure you have a disposal plan before you start.
- Not Checking for Asbestos: Homes built before the 1980s may contain asbestos in adhesives. If in doubt, test before disturbing old materials.
Preparing for What Comes Next
Once you’ve mastered how to tear up ceramic tile floor and cleaned your subfloor, the next phase is installation. Before laying new flooring, make sure your surface is:
- Smooth (no remaining mortar or ridges)
- Dry and clean
- Structurally sound
- Leveled properly
At this stage, you can install new tile, hardwood, vinyl, or laminate — or even polish the concrete for a sleek, modern finish.
Your hard work pays off when that new surface goes down perfectly smooth.
Frequently Asked Questions (FAQs) About How to Tear Up Ceramic Tile Floor
1. What is the easiest way to remove ceramic tile from a floor?
The easiest and fastest way to remove ceramic tile is by using a rotary hammer or demolition hammer with a chisel attachment. Start by breaking one tile near an edge or transition area, then work methodically across the floor. Power tools make quick work of stubborn mortar and are ideal for larger rooms.
2. Can you remove ceramic tile without damaging the subfloor?
Yes, you can — but it takes patience. The key is keeping your chisel or scraper at a low angle to lift tiles without gouging the subfloor. For wood or plywood subfloors, avoid power tools that might dig too deep. On concrete, surface damage can be ground smooth afterward with a diamond wheel.
3. Do I need to remove the thinset after removing the tile?
Absolutely. Thinset mortar hardens like concrete and must be removed to ensure a smooth base for new flooring. Use a floor scraper, rotary hammer, or angle grinder with a diamond cup wheel to grind away residue. A clean, even subfloor ensures new flooring adheres correctly and lasts longer.
4. How long does it take to tear up ceramic tile floor?
The time depends on the size of the area, the tools you’re using, and the installation method.
- Small bathroom (40–60 sq. ft): 2–4 hours
- Medium kitchen (100–200 sq. ft): 5–8 hours
- Large space (300+ sq. ft): 1–2 full days
Using power tools can cut the time nearly in half compared to manual removal.
5. Can I reuse ceramic tiles after removing them?
In most cases, no. Ceramic tiles are brittle and tend to crack during removal. However, if they’re only lightly adhered or installed over mastic (not mortar), some tiles may come off intact. Be prepared for a lot of breakage and dust if you attempt to salvage them.
6. How do I know if I have asbestos under my tile?
If your home was built before the 1980s, there’s a small chance that adhesive, mastic, or old vinyl layers beneath the ceramic could contain asbestos. Before disturbing old materials, get them tested by a certified lab. Never scrape or grind unknown flooring layers without confirmation — it can be dangerous to your health.
7. Should I remove the cement board after removing the tiles?
If the cement board (backer board) is cracked, damaged, or uneven, it’s best to remove and replace it. However, if it’s still in good shape, you can clean it thoroughly and reuse it as the base for new tile or flooring. Just make sure it’s smooth and free of old mortar residue.
8. What’s the best way to control dust during tile removal?
Dust control is crucial. Use these tips:
- Spray a light mist of water on the floor before prying tiles up.
- Use a shop vac with a HEPA filter to collect dust as you work.
- Seal off doors and vents with plastic sheeting and painter’s tape.
- Keep windows open for ventilation.
Never use household vacuums — they can clog or spread dust back into the air.
9. Can I remove tile myself or should I hire a professional?
If you’re comfortable using power tools and have protective gear, DIY tile removal is completely doable. However, if your floor covers large areas, multiple rooms, or includes stubborn mortar or asbestos risk, hiring professionals may save time and prevent damage to your subfloor or walls.
10. How much does it cost to remove ceramic tile floor?
The cost varies based on whether you DIY or hire help:
- DIY: $1–$2 per square foot (tools, disposal, and materials).
- Professional removal: $3–$7 per square foot, depending on difficulty, tile type, and location.
DIYing can save hundreds of dollars — especially in larger spaces.
11. How do I remove tile adhesive or mortar from concrete floors?
After tile removal, use an angle grinder with a diamond cup wheel to grind off mortar. For softer adhesives, apply a mortar dissolver or adhesive remover and scrape manually. Always wear a respirator and eye protection when grinding — cement dust is extremely fine and irritating.
12. Is there a difference between removing ceramic tile and porcelain tile?
Yes, but the process is similar. Porcelain is denser and tougher than ceramic, meaning it often takes more force to break and pry up. Use a rotary hammer or heavy-duty scraper, and expect porcelain removal to be slightly more time-consuming.
13. Can I install new tile right after tearing up the old one?
You’ll need to clean and inspect the subfloor first. After removing all debris, check for cracks or uneven spots. Patch, sand, or level the surface if needed. Only then can you apply new thinset and begin laying new tile — skipping prep work can lead to uneven tiles or cracking later.
14. What should I do with all the broken tiles and debris?
Ceramic tile is heavy, so it must be disposed of properly:
- Use contractor-grade trash bags or buckets.
- Rent a dump trailer or small dumpster if removing large areas.
- Check with local recycling or disposal centers — some accept clean ceramic as construction waste recycling material.
Never overload household garbage bins — ceramic is dense and can break them.
15. Can I use a floor scraper or grinder for the entire job?
You can, but it’s not always efficient. A manual floor scraper is fine for small areas, but for larger rooms or thick mortar, a rotary hammer or demolition tool will save hours. Grinders are best for the finishing stage — smoothing leftover mortar and cleaning the subfloor surface.
Conclusion: Turn Old Ceramic into a Fresh Start
Tearing up a ceramic tile floor may not be glamorous, but it’s one of the most rewarding DIY home improvement projects you can tackle. Once you understand how to tear up ceramic tile floor safely and efficiently, you gain the power to completely transform your space — from outdated and cracked tiles to a clean, modern foundation ready for something new.
With the right preparation, tools, and patience, you can remove even the toughest ceramic flooring without damaging your subfloor. It’s dusty, noisy, and a bit labor-intensive, but every piece you pry up brings you one step closer to a fresh start.
Whether you’re upgrading to luxury vinyl, installing sleek porcelain, or refinishing concrete for an industrial look, your new surface will only be as good as your prep work. That means clean removal, smooth leveling, and a solid foundation.
So grab your safety gear, roll up your sleeves, and get to work — because the floor beneath your feet is about to become your favorite part of the house. And the best part? You’ll know you did it yourself.