Ceramic coated knives are popular in kitchens for their non-stick properties, sharpness, and durability. However, like all knives, they require maintenance to stay sharp and functional. Sharpening a ceramic coated knife is slightly different from sharpening a traditional steel knife because of the coating and the material of the blade. This article will guide you through the process of sharpening a ceramic coated knife, including the tools you’ll need, step-by-step instructions, and tips for maintaining the knife’s edge and coating.
1. Understanding Ceramic Coated Knives
Before delving into sharpening techniques, it’s important to understand what makes ceramic coated knives unique and why special care is needed when sharpening them.
1.1 What is a Ceramic Coated Knife?
A ceramic coated knife is a knife with a steel or other metal blade that has been coated with a layer of ceramic. This coating gives the knife non-stick properties, making it easier to slice through food without it sticking to the blade. The ceramic coating also provides some resistance to wear and corrosion, enhancing the knife’s durability.
1.2 Benefits of Ceramic Coated Knives
- Non-Stick Surface: The ceramic coating prevents food from sticking to the blade, making it easier to slice through items like vegetables, cheese, and meats.
- Corrosion Resistance: The ceramic layer protects the underlying metal from rust and corrosion.
- Aesthetic Appeal: Ceramic coatings come in various colors and finishes, adding a stylish touch to kitchen tools.
- Durability: While the coating can wear off over time, it generally protects the blade from minor scratches and stains.
1.3 Challenges in Sharpening Ceramic Coated Knives
The main challenge in sharpening ceramic coated knives is preserving the integrity of the ceramic coating while effectively sharpening the blade. The ceramic coating is typically more brittle than the metal underneath, meaning that improper sharpening techniques can lead to chipping or wearing away of the coating.
2. Tools and Equipment Needed for Sharpening
Choosing the right tools for sharpening a ceramic coated knife is crucial to avoid damaging the coating. Here are the tools you’ll need:
2.1 Sharpening Stones
Ceramic Whetstones
Ceramic whetstones are a popular choice for sharpening ceramic coated knives. They are available in various grits, with coarse grits (around 200-400) used for sharpening and fine grits (1000 and above) for polishing. The smooth surface of ceramic whetstones helps maintain the integrity of the coating while sharpening the blade.
Diamond Stones
Diamond stones are another effective tool for sharpening ceramic coated knives. The diamond surface is harder than the ceramic coating, making it capable of sharpening even the hardest blades. However, caution is needed to avoid stripping the coating.
2.2 Electric Knife Sharpeners
Electric sharpeners designed for ceramic knives can be used, but they must be used with extreme care. Some electric sharpeners have settings or slots specifically designed for ceramic or coated knives, which reduce the risk of damaging the blade.
2.3 Honing Rods
Ceramic Honing Rods
A ceramic honing rod is ideal for regular maintenance of ceramic coated knives. Honing realigns the blade’s edge without removing significant material, which is crucial for preserving the ceramic coating.
Diamond Honing Rods
Diamond honing rods can also be used for regular honing, especially if the knife’s edge has become slightly dull. These rods are gentle enough to maintain the edge without damaging the coating.
2.4 Sharpening Guides
A sharpening guide can help maintain a consistent angle when sharpening, which is particularly important for ceramic coated knives. Inconsistent angles can lead to uneven sharpening and potential damage to the coating.
3. Step-by-Step Guide to Sharpening a Ceramic Coated Knife
Sharpening a ceramic coated knife requires patience and precision. Follow these steps to ensure your knife remains sharp and the coating intact.
3.1 Preparing Your Work Area
Start by setting up a clean, stable workspace. Gather all necessary tools, including the sharpening stone, honing rod, and any sharpening guides. Ensure that the knife is clean and dry before sharpening.
3.2 Choosing the Correct Angle
The angle at which you sharpen the knife is crucial. Most kitchen knives are sharpened at an angle between 15 and 20 degrees. Using a sharpening guide can help you maintain this angle consistently throughout the process.
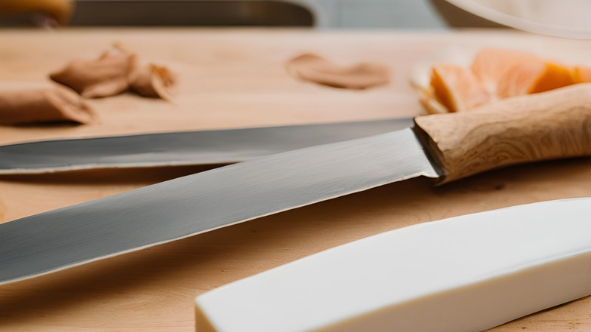
3.3 Sharpening with a Ceramic Whetstone
Step 1: Soak the Whetstone (If Applicable)
Some ceramic whetstones require soaking in water before use. Check the manufacturer’s instructions for your specific stone. If required, soak the stone in water for 5-10 minutes.
Step 2: Position the Whetstone
Place the whetstone on a non-slip surface, such as a damp cloth or a whetstone holder, to keep it stable during sharpening.
Step 3: Begin Sharpening
Hold the knife at the correct angle and draw the blade across the stone in a smooth, controlled motion. Start with the coarse side of the stone if your knife is very dull. Begin at the base of the blade (closest to the handle) and move toward the tip, ensuring that the entire edge makes contact with the stone.
Step 4: Flip and Repeat
After completing several strokes on one side, flip the blade and repeat the process on the other side. Maintain the same angle and pressure to ensure an even edge.
Step 5: Polish the Edge
If your whetstone has a fine grit side, flip the stone and repeat the sharpening process to polish the edge. This step is crucial for achieving a razor-sharp edge while preserving the ceramic coating.
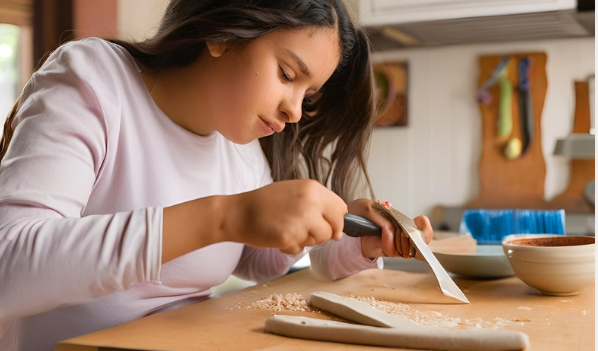
3.4 Sharpening with a Diamond Stone
Diamond stones are highly effective for sharpening ceramic coated knives, but they require careful handling to avoid damaging the coating.
Step 1: Wet the Diamond Stone
Some diamond stones require lubrication with water or a special fluid. Check the manufacturer’s instructions and apply the appropriate lubricant to the stone.
Step 2: Position the Knife
Hold the knife at the correct angle and gently draw the blade across the stone. Use light pressure to avoid stripping the ceramic coating.
Step 3: Alternate Sides
After sharpening one side of the blade, flip the knife and sharpen the other side. Keep the angle consistent and use a smooth, even motion.
Step 4: Finish with a Fine Grit
If the diamond stone has multiple grit levels, finish with the finer grit to polish the edge and refine the sharpness.
3.5 Using an Electric Sharpener
Electric sharpeners can be convenient, but they must be used with caution, especially with ceramic coated knives.
Step 1: Select the Appropriate Setting
Choose a setting or slot designed for ceramic or coated knives. Some electric sharpeners have specific settings for these types of blades.
Step 2: Insert the Knife
Insert the knife into the sharpener slot, starting with the heel of the blade. Gently pull the knife through the slot, maintaining consistent speed and pressure.
Step 3: Repeat as Needed
Depending on the sharpener and the condition of the blade, you may need to pull the knife through the slot several times. Follow the manufacturer’s instructions for best results.
Step 4: Test the Sharpness
After sharpening, test the knife’s sharpness by slicing through a piece of paper or a soft fruit like a tomato. The knife should cut cleanly without tearing or resistance.
3.6 Honing the Knife
Regular honing helps maintain the knife’s edge between sharpening sessions and can extend the time between sharpening.
Step 1: Hold the Honing Rod
Hold the honing rod vertically on a stable surface with the tip resting on a cutting board.
Step 2: Position the Knife
Hold the knife at a 15-20 degree angle against the honing rod.
Step 3: Draw the Knife Down the Rod
Starting with the base of the blade, draw the knife down the rod in a sweeping motion. Repeat on the other side of the blade, alternating sides for 5-10 strokes.
Step 4: Test and Clean
Test the sharpness of the blade and wipe the knife clean after honing.
4. Maintaining Your Ceramic Coated Knife
Proper maintenance is essential for preserving both the sharpness of the blade and the integrity of the ceramic coating.
4.1 Regular Cleaning
Always clean your ceramic coated knife after each use to prevent food residue from adhering to the coating. Use warm water, mild dish soap, and a soft sponge. Avoid abrasive scrubbers that can scratch the coating.
4.2 Proper Storage
Store your ceramic coated knives in a knife block, magnetic strip, or protective sheath to prevent the blades from coming into contact with other objects, which can chip the coating.
4.3 Regular Honing
Honing your knife regularly helps maintain the edge and reduces the frequency of sharpening. Use a ceramic or diamond honing rod for best results.
4.4 Avoiding Harsh Cutting Surfaces
To protect the ceramic coating, avoid cutting on hard surfaces like glass or granite. Instead, use a wood or plastic cutting board to preserve the edge and coating.
4.5 Periodic Sharpening
Even with regular honing, your knife will eventually need sharpening. Follow the steps outlined in this guide to keep your knife in optimal condition.
5. Common Mistakes to Avoid
When sharpening a ceramic coated knife, there are several common mistakes that can compromise the blade or damage the coating.
5.1 Using the Wrong Tools
Using the wrong sharpening tools can damage the ceramic
coating or fail to sharpen the blade effectively. Stick to ceramic whetstones, diamond stones, or electric sharpeners designed for ceramic or coated knives.
5.2 Applying Too Much Pressure
Excessive pressure during sharpening can strip the ceramic coating or chip the blade. Use light to moderate pressure and let the sharpening tool do the work.
5.3 Inconsistent Angle
Sharpening at an inconsistent angle can result in an uneven edge or damage to the coating. Use a sharpening guide or practice maintaining a consistent angle throughout the process.
5.4 Over-Sharpening
Sharpening your knife too frequently can wear down the blade and the ceramic coating. Only sharpen when necessary and maintain the edge with regular honing.
5.5 Neglecting Regular Maintenance
Failing to clean, hone, and store your knife properly can lead to dullness and damage over time. Regular maintenance is key to extending the life of your ceramic coated knife.
6. Conclusion: Mastering the Art of Sharpening Ceramic Coated Knives
Sharpening a ceramic coated knife requires a careful balance of technique and tools to ensure the blade remains sharp while preserving the integrity of the coating. By understanding the unique characteristics of ceramic coated knives and following the steps outlined in this guide, you can keep your knives in top condition for years to come.
Whether you’re a professional chef or a home cook, mastering the art of sharpening ceramic coated knives will enhance your kitchen experience, making food preparation easier and more enjoyable. Regular maintenance, proper sharpening techniques, and avoiding common mistakes will ensure that your ceramic coated knives remain a reliable and stylish tool in your culinary arsenal.