Tips and Tricks to Ceramic Coat Headers
Headers are a crucial component of an automotive exhaust system, responsible for channeling exhaust gases away from the engine. Over time, headers are subjected to extreme heat and corrosive conditions, which can lead to degradation and diminished performance. One effective way to enhance the longevity and performance of headers is by applying a ceramic coating. In this guide, we will explore the process of ceramic coating headers, from understanding what ceramic coating is to the benefits it offers, and the critical importance of proper application.
A. Explanation of What Ceramic Coating Is?
Ceramic coating is a thin layer of ceramic material that is applied to the surface of various substrates, including metals like stainless steel, to provide a protective shield. This ceramic layer is designed to withstand high temperatures, resist corrosion, and offer superior durability. In the context of headers, ceramic coatings are primarily composed of advanced ceramic nanoparticles that create a heat-resistant barrier. This barrier helps in dissipating heat more efficiently, reducing thermal stress, and preventing heat-related damage to the headers. Furthermore, ceramic coatings often feature hydrophobic properties, making them water and oil-repellent, and they can significantly improve the appearance of headers.
B. Benefits of Ceramic Coating Headers:
Ceramic coating headers offers a multitude of benefits that can enhance both the functionality and aesthetics of your vehicle’s exhaust system:
- Heat Resistance: Ceramic coatings can endure extreme temperatures, helping headers operate at peak efficiency while preventing heat-related damage to nearby components and minimizing heat soak.
- Corrosion Resistance: Headers are exposed to moisture and corrosive elements. Ceramic coatings create a protective barrier that resists corrosion and extends the lifespan of the headers.
- Improved Performance: Ceramic coatings contribute to better exhaust gas flow by reducing heat buildup in the headers. This can result in increased horsepower and torque, enhancing your vehicle’s performance.
- Enhanced Appearance: Ceramic-coated headers often have a sleek, glossy appearance that not only looks impressive but also maintains its finish over time.
- Easier Maintenance: The hydrophobic properties of ceramic coatings make headers easier to clean and maintain, reducing the effort required for upkeep.
C. Importance of Proper Application:
While the benefits of ceramic coating headers are clear, achieving these advantages hinges on the proper application of the ceramic coating. Proper application ensures that the ceramic coating adheres correctly to the headers, forming a consistent and effective protective layer. Inadequate or incorrect application can result in uneven coverage, diminished performance, and potential issues down the road. Therefore, following the right steps and using the appropriate tools and materials during the ceramic coating process is essential to harness its full potential and ensure long-lasting protection for your headers.
In the subsequent sections of this guide, we will delve into the step-by-step process of ceramic coating headers, detailing the materials required, and offering tips to help you achieve a successful and effective application.
How to Ceramic Coat Headers
This ceramic paint made for headers is there for one reason to protect the steel during shelf life. We brought it up to temperature and sped the content to show you that within minutes. It started to burn off and was completely gone by the time the engine was at operating temperature. And corrosion will start eating away at the header from the outside drastically, shortening their life.
Apply VHT ceramic coating on the header
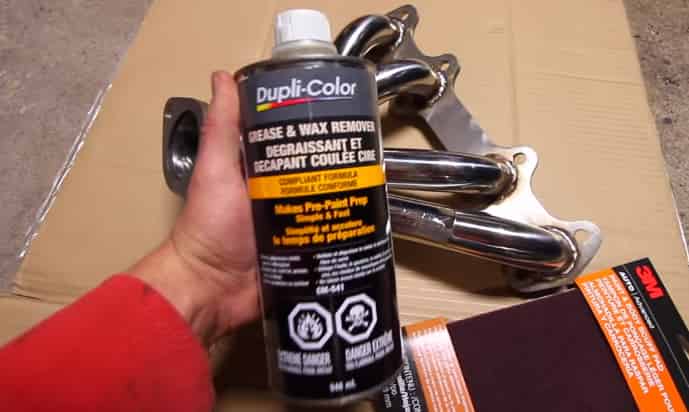
Let’s see VHT ceramic coating what do on headers. Now, we’re using a new unpainted header. It’s necessary to follow the application process to the letter. It includes a quick prep using duper colors prep spray. Make sure to use some types of shop towels to wipe it all down.
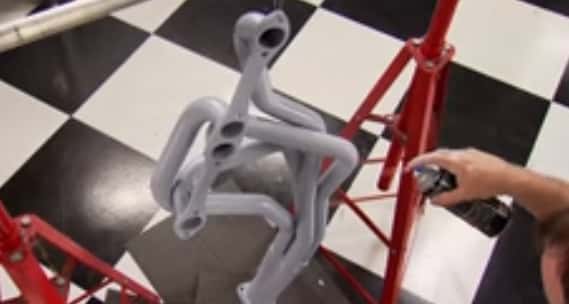
At this time, we can apply VHT’s flat grey flameproof primer, one light coat, followed by two heavier coats. Several colors of the final ceramic coat are available here. We’re using a flat grey to give us a subtle look. Apply it in several layer coating as well. Let the coating dry for an hour before you install it.
Although it has very high-temperature resistance, that doesn’t mean it’s scratch-resistant, so take your time bolting them up. And make sure to wear clean gloves. Read more, how to ceramic coating in the car?
Test the ceramic coat headers
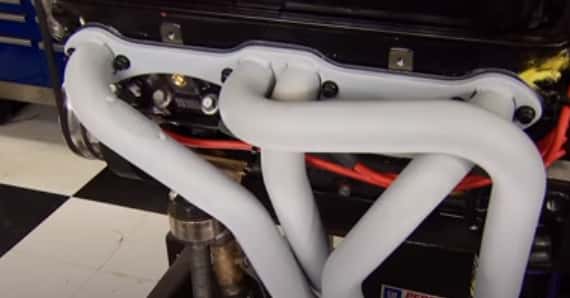
We’re going to start the engine and let it idle for about 10 minutes, then shut it off and let it cool down to cure the coding. It will ensure maximum adhesion and extend its life. This time around, we’re pouring the coals to the coding by making several dyno poles to 5500 RPM at 724 degrees, and nothing burns off or changes colors.
After another run, the tube reached 872 degrees after 20 minutes and several more poles 898. Then we even retarded the timing for degrees to put. Even more heat in the header to 976 degrees without burning off.
This ceramic paint can handle a lot more temperature up to that 2000 degree mark. But you’ll never get your tubes that hot, but it’s a good thing to know we still have 1000 degrees to go. So, we always trust VHT ceramic coating paint for our headers. Also read, ceramic spray wax.
6 Easy and faster steps to ceramic coat headers
Here are some effective and easy steps to ceramic coat headers as well. For ceramic coat headers, you’ll need some tools and materials. Let’s gather those tools and start ceramic coat headers.
What will you need for ceramic coat headers?
- Spray gun
- High-temperature ceramic paint
- Headers
- Oven
- Sandblaster
Step 1: Clean the header
If your header is new, clean the header surface. But, if it is an old header, clean the oil, greasy residue from the header surface as well. In this step, make sure the oil, dirt, grease removed from the header. Check here, Calphalon ceramic cookware.
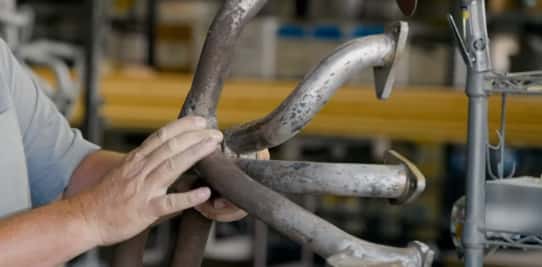
Step 2: Use sandblaster on the header
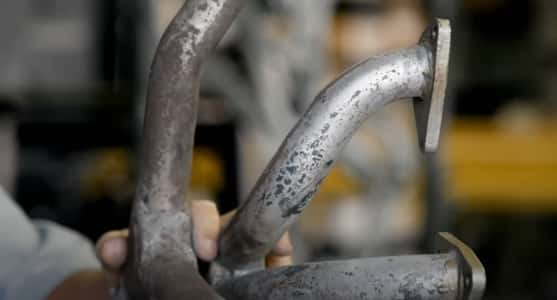
Use sandblaster on the header surface that you want to ceramic coat. Scrap with sandpaper to take out stain, black-nasty dirt, and old paint that is already faded.
I recommend, start using a sandblaster from one side to another side. You can complete all the header surfaces by using this method. When you finish scraping it, wipe it out with a soft brash. Make sure all the dirt and dust wipe off. Clean it as well before start another step.
Step 3: Bake the header in an oven
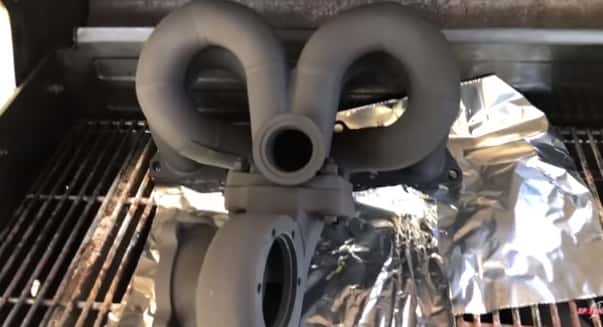
Set up your oven at 450 degrees Fahrenheit. Place the header in the oven for an hour. The baking step will help to bake off any residue or imperfections. It also helps the paint adhere. Now check, mothers ceramic coating.
Remove the header from the oven after an hour and let it be cool.
Step 4: Spray high-temperature paint on header surface
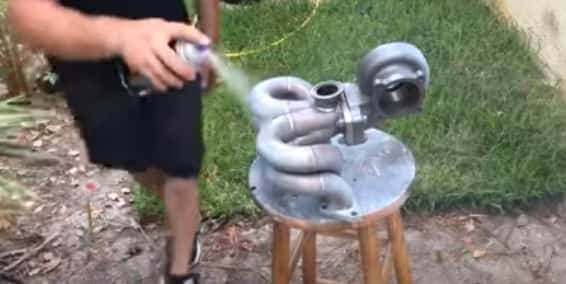
For this step, I’ve chosen tich line black stain header coating ceramic paint. Pour the paint into a spray gun and shake it as well. You can get this paint from Amazon by clicking this link. I’ve bought it from Amazon for my header.
Normal ceramic paint is not suitable for the header because the header always stays near to high temperature when the engine is running. So this ceramic coating good to go up to 2000 degrees Fahrenheit.
Hang the header with a strong rope. Hang it in free space. Then tart spray paint on the header surface. Make sure you coat all the header surfaces. Before you finish painting, recheck the painted surface. Then, let it dry for some time.
Step 5: Bake the header in an oven
Now, place the header in an oven to cure the header parts. Turn the oven temperature to 450 degrees Fahrenheit and keep it for an hour. It cures all the paint and helps to last longer. Related post, remove scratches from ceramic stove top.
Step 6: Header installation
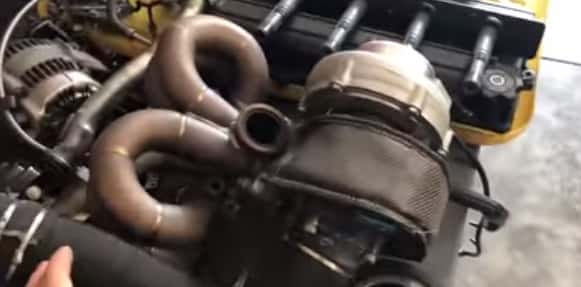
It is the last step to install the header in your car. After installing your header, drives the car for an hour to cure in 750 degrees Fahrenheit. Now you are ready to go with your job.
6 Easy and Faster Steps to Ceramic Coat Headers
Ceramic coating headers is a process that can help protect them from high temperatures and corrosion while improving their appearance. Here are six easy and faster steps to ceramic coat headers:
Materials You’ll Need:
- Ceramic header coating kit (includes ceramic coating, applicator, and gloves)
- Wire brush or sandpaper
- Degreaser
- Compressed air or a clean, dry cloth
- Heat-resistant masking tape
- Respirator mask (optional but recommended for safety)
Steps:
Preparation:
- Start by removing the headers from the vehicle. Make sure they are completely cool before proceeding.
- Use a wire brush or sandpaper to clean the headers’ surface, removing any rust, dirt, or existing coatings. The goal is to create a smooth and clean surface for the ceramic coating to adhere to.
- Wipe down the headers with a degreaser to remove any oil or grease residues. Rinse thoroughly and allow them to dry completely. Compressed air or a clean, dry cloth can help speed up the drying process.
Masking:
- Use heat-resistant masking tape to cover any areas you don’t want to coat, such as the flanges or mounting points. Ensure that the tape is securely adhered to the headers to prevent any overspray.
Safety Gear:
- Put on a respirator mask to protect yourself from inhaling any fumes or particles that may be released during the coating process.
Application:
- Open the ceramic coating kit and mix the contents according to the manufacturer’s instructions. This typically involves combining a base coat and a hardener.
- Use the included applicator (usually a brush or foam brush) to evenly apply the ceramic coating to the headers. Apply a thin and uniform layer, working in small sections if necessary.
- Make sure to follow the manufacturer’s recommended drying times between coats. Multiple coats may be required for optimal protection.
Curing:
- Allow the ceramic-coated headers to cure according to the manufacturer’s instructions. This often involves baking them in an oven to achieve maximum heat resistance. Follow the recommended curing temperature and time.
Final Inspection:
- After curing, inspect the headers to ensure that the ceramic coating is even, smooth, and free from defects. Remove any masking tape, and reattach the headers to the vehicle.
Additional Tips:
- Ensure that your workspace is well-ventilated to dissipate any fumes.
- Wear appropriate protective gear, including gloves and eye protection.
- Follow the manufacturer’s instructions on the ceramic coating kit for the best results and safety.
- Avoid touching the coated headers until they have fully cured to prevent smudging or damaging the coating.
Ceramic coating headers can provide long-lasting protection and a sleek appearance. By following these steps carefully and using the right materials, you can achieve a professionally coated finish on your headers.
3 Common Mistakes While Ceramic Coat Headers
Ceramic coating headers is a precision task that requires attention to detail and patience. Here are three common mistakes to avoid while ceramic coating headers:
Insufficient Surface Preparation:
- One of the most critical steps in ceramic coating headers is preparing the surface correctly. Many people make the mistake of not thoroughly cleaning and degreasing the headers before applying the ceramic coating. Failing to remove all traces of oil, grease, rust, or previous coatings can lead to poor adhesion and a subpar finish.
- Solution: Take the time to properly clean and prepare the header’s surface. Use a wire brush or sandpaper to remove rust and contaminants, then clean it thoroughly with a degreaser. Rinse and dry the headers completely before applying the ceramic coating.
Inadequate Masking and Overspray:
- Headers often have various components, such as flanges or mounting points, that you don’t want to coat with ceramic. Failing to mask these areas properly can result in overspray, which can be challenging to remove and may affect the performance of the headers.
- Solution: Invest time in masking the headers effectively. Use high-temperature masking tape to cover any areas you want to protect. Ensure the tape is securely adhered to prevent any ceramic overspray.
Inconsistent or Excessive Coating Application:
- Achieving a uniform and thin ceramic coating is crucial for optimal performance and appearance. Some individuals apply the ceramic coating too thickly or unevenly, which can result in an uneven finish, a rough texture, or even drips.
- Solution: Follow the manufacturer’s instructions for applying the ceramic coating. Typically, it’s recommended to apply thin, even coats. Use the included applicator (usually a brush or foam brush) and work in small sections to ensure uniform coverage. Allow each coat to dry for the specified time before applying additional coats if necessary.
Remember that ceramic coating headers is a meticulous process that requires precision and patience. Avoiding these common mistakes will help you achieve the desired level of protection, heat resistance, and appearance for your headers.
FAQ’s
Certainly, here are some frequently asked questions (FAQs) related to ceramic coating headers:
What is the primary purpose of ceramic coating headers?
Ceramic coating headers primarily serve to protect them from high temperatures and corrosion, enhance their durability, and improve exhaust system performance.
Can I ceramic coat headers myself, or should I seek professional help?
While DIY ceramic coating is possible, it requires careful preparation and application. Many enthusiasts successfully coat their headers, but if you’re unsure about the process, professional assistance is an option.
What type of ceramic coating should I use for headers?
Look for ceramic coatings specifically designed for high-temperature applications. These coatings are formulated to withstand the extreme heat generated by headers.
What are the key steps in ceramic coating headers?
The key steps typically include surface preparation, masking, applying the ceramic coating, and curing the coating. Each step is essential for a successful application.
How do I prepare the headers for ceramic coating?
Preparation involves cleaning the headers to remove dirt, rust, and contaminants, followed by thorough drying. It’s crucial to have a clean and smooth surface for proper adhesion.
Can I apply ceramic coating directly to rusty headers?
It’s not recommended to apply ceramic coating to rusty headers. Remove rust using a wire brush or sandpaper and ensure the surface is rust-free before proceeding.
Do I need to cure the ceramic coating, and how is it done?
Yes, curing is essential to achieve the full benefits of the ceramic coating. Curing typically involves baking the headers in an oven at a specified temperature and duration as per the manufacturer’s instructions.
How many coats of ceramic coating are recommended for headers?
The number of coats can vary depending on the product and manufacturer. Typically, multiple thin coats are applied, allowing each coat to dry between applications for optimal results.
Is ceramic coating headers only for performance gains, or does it offer other benefits?
While improved performance is one benefit, ceramic coating also provides corrosion resistance, easier maintenance, and an enhanced appearance.
Can ceramic coating headers withstand extreme heat and high-performance applications?
Yes, ceramic coatings are designed to endure extreme temperatures, making them ideal for headers used in high-performance applications.
How long does a properly applied ceramic coating on headers last?
The longevity of a ceramic coating depends on factors like the quality of the coating, driving conditions, and maintenance. Generally, a well-applied ceramic coating can last several years.
Can I still ceramic coat headers if they have already been coated in the past?
Yes, you can re-coat headers if they have been previously coated. Ensure that the headers are properly cleaned and prepared before applying the new coating.
Is it safe to drive immediately after ceramic coating headers, or should I wait for curing?
It’s essential to allow the ceramic coating to fully cure before driving. Follow the manufacturer’s recommended curing time and temperature for the best results.
Conclusion
In conclusion, ceramic coating headers is a valuable process that can significantly enhance the performance, durability, and appearance of your vehicle’s exhaust system. By applying a heat-resistant ceramic layer to the headers, you can protect them from extreme temperatures and corrosion while also enjoying improved exhaust flow and easier maintenance.
Understanding what ceramic coating is and the benefits it offers, including heat resistance, corrosion protection, and enhanced performance, underscores its importance in maintaining and optimizing your headers.
Proper application is paramount to harnessing the full potential of ceramic coating. From thorough surface preparation to meticulous masking and curing, each step plays a crucial role in ensuring a successful and long-lasting ceramic coating.
By following the guidelines and answering key questions about ceramic coating headers, you can embark on this process with confidence, resulting in headers that not only perform optimally but also stand the test of time, even under the most demanding driving conditions. Whether you’re an automotive enthusiast or simply seeking to protect your investment, ceramic coating headers is a valuable upgrade that delivers both form and function.
can i use ceramic coating inside the headers for slicker air flow?