Clay is used for Pottery, and it has various types, used for earthenware, stoneware, and porcelain when used with different minerals and firing conditions. Are you looking for making ceramic tiles tips? In this article, we’re going to learn how to make ceramic tiles without kiln? No other earth material has such importance or wide uses as Clay does: [toc]
- Impure clays are used to make bricks, tiles, and crude types of poetry.
- Kaolin is required for fine grades of ceramic materials kaolin is also used as paper coating and filter, which gives gloss to a paper and increases the opacity of a paper.
- Kaolin is also used to increase resistance to heat.
- Fuller’s earth is also Clay which is used in wool scouring.
- By adding Clay to porous soil, several earth dams are made impermeable to water.
- Clay can also reduce water loss in canals.
- Portland cement usually includes limestone and Clay.
- Clay is also used as a water softener.
- Clay is majorly used for drilling mud.
Can you Make Ceramic Tiles Without a Kiln?
Ceramic tiles typically require high-temperature firing in a kiln to harden and set the clay, making them durable and water-resistant. Attempting to make ceramic tiles without a kiln is challenging because it’s nearly impossible to achieve the necessary firing temperatures (around 1800-2300°F or 980-1260°C) at home using alternative methods.
While you can create clay tiles or other decorative pieces using air-dry clay, they won’t have the same durability, waterproofing, or heat resistance as properly fired ceramic tiles. Kilns are essential for achieving the structural and aesthetic qualities that define ceramic tiles.
How to make ceramic tiles without a kiln
You can surely make ceramic tiles without a kiln. There are three ways to make ceramic tiles at home. Usually, people do not know about it. They think that Kiln is a compulsory thing to Pottery although it’s one of the essential tools we can make pottery product without Kiln. So, here we go!
- Roll down ceramic Clay and then flatten them with two flat kinds of wood
- Then cut out the tiles in equal size. It should be thick.
- After cutting the tiles, cut them in equal parts
- Now you need to fire them.
Different ways are:
- Raku firing
- Pit firing
- A kitchen oven
Raku firing
Raku fire should be created outdoor in a ventilated area. You have to house the ware using a barrel. Place the poetry inside carefully, and then place the barrel near to the fire. The fire should be heat enough from 760 to 780 degrees Celsius.
It takes a long time to achieve this temperature. Once it’s fired, remove the Pottery carefully using gloves and tongs, then put it immediately in cold water, then clean the carbon from the glaze, then let it dry for one day before decorating, and you’re done. Read more, how to make ceramic tile shine?
Pit firing
It is usually known as smoke firing. For pit firing, a hole should be dug in a well-ventilated area and protected by the wind. Build up the temperature up to 980-1100 degrees Celsius.
Then place the Pottery inside it and let it heat from 12 to 24 hours. Once finished, remove the poetry carefully with gloves and tongs and set it aside. Check here, how to make ceramic tile non-slippery?
Kitchen oven
For the kitchen, the Oven makes sure to use Clay to be fixed at a low temperature around 120 degrees Celsius. Heat the Pottery for one to three hours. Three hours for more thick pottery products
Overheating the Pottery may lead to hard and brittle products. The Pottery cannot be glazed because Oven cannot reach the temperature, but you can make poetry through the kitchen oven. Related article, how to repair ceramic bowl?
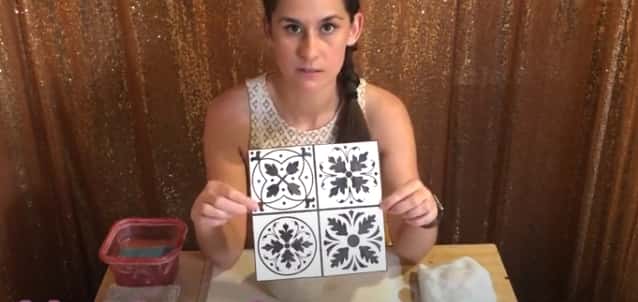
How to design ceramic tiles
Things you need
- Blank glazed tiles
- The low fire required liquid gaze
- Watercolor brush
- Tracing paper
- Pencil
- Paints over crayons
Procedure:
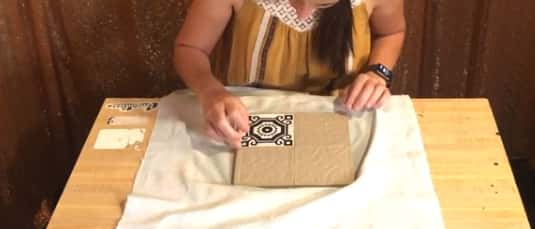
Take a piece of paper the same size as a tile and draw over it according to your creative imagination and you can draw or paint anything you want.
Trace off the design outlines by using pencil and tracing paper, remove the tracing paper, and scratch the backside of the paper with a regular pencil.
Now, place the page on the tile. Place the scratched side down. The scratched side should be in touch with the front side of a tile, and then trace the design on the tile with the pencil.
Now take the liquid glaze, then thin with a reducer if needed, and then fill it in tile. Place a tike in the Oven and heat to 250 Fahrenheit w
When it’s done, please don’t remove it immediately. Let it cool down, and then remove it carefully using gloves. Now wash the tile with soap and water and remove pencil traces from the tile. People also search for, how to make a ceramic bowl?
Self-hardening Clay
When we think about ceramic clay poetry, our minds imagine different pottery pieces and the process made through. But unfortunately, they also think that Kiln is compulsory.
There are several ways to make ceramic pottery products without Kiln, and people even do not know about it. There are several self-hardening clays we can use
Mexican pottery clay doesn’t need firing or Kiln. They just dry through the air. It needs pottery clay, water, and a chemical setter to help modeled objects get hard and durable when they hard in the air.
So, if you do not have a kiln in your home, you can use self-hardening Clay for your decorative tiles, and you can customize it according to your desire. You may like, how to install shower curtains over ceramic tiles?
Why make your ceramic tiles?
Make your own ceramic tiles to get creative and create a tile with your own design and paint as your mood, style, and desire. You can also make customized and decorative tiles, which are in the end going to pay you back as a result of happiness and satisfaction.
You can decorate your house with your choice and also gift to loved ones making your relations strong.
Advantages of ceramic tiles
There are several advantages of ceramic tiles. It is always preferred to use ceramic tiles flooring because of its big list of benefits. Some of them are discussed below.
Water resistance
If we choose glazed ceramic tiles, we can forget about humidity or a humid environment. Glaze ceramic tiles are impervious to water and stains. These tools are perfect for the bathroom and kitchen. If you choose unglazed ceramic tiles, you have to seal the tiles to protect them from water liquid.
Durability
Ceramic tiles do have good durability. It can last 10 to 20 years and more if maintained well.
Easy maintenance
You can easily wipe. The stains rest on the tires. You need to swipe them up, and if any single tile does crack, you can replace it.
No allergy concerns
Due to the hard surface of tiles, it does not absorb pollens, dirt dust, animal hair. Hence, preventing allergies.
Note: Ceramic tiles are very heavy, and these are not recommended for the second and third floors. Suppose you put ceramic flooring on the second or third floor. So, I recommend you qualified and professional check the structure’s integrity so that it doesn’t put extra stress.
Best Way to Make Ceramic Tiles Without a Kiln
Creating ceramic tiles without a kiln is possible using air-dry clay, but it’s essential to note that these tiles won’t be as durable or water-resistant as traditionally fired ceramic tiles. Here’s a basic guide on how to make ceramic tiles without a kiln:
Materials You’ll Need:
- Air-dry clay
- Rolling pin
- Tile molds (if desired)
- Cookie cutters or templates
- Plastic wrap
- A flat, non-porous surface
- Sandpaper (optional)
- Acrylic paints and sealant (for decoration)
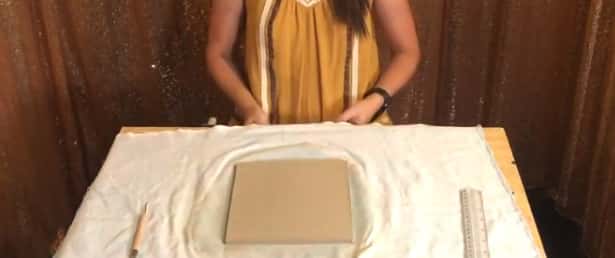
Step-by-Step Guide:
- Prepare the Clay:
- Knead and condition the air-dry clay to remove air bubbles and make it pliable.
- Roll Out the Clay:
- Roll the clay out to your desired thickness using a rolling pin. Aim for an even thickness across the entire surface.
- Cut Tiles:
- Use cookie cutters, templates, or a knife to cut the clay into tile shapes. You can also create custom molds for specific designs.
- Smooth and Shape:
- Smooth the edges and surfaces of your tiles using your fingers or a damp sponge. You can also add texture or designs at this stage.
- Drying:
- Place the tiles on a flat, non-porous surface and let them air dry. This can take several days to a week or more, depending on the thickness of the tiles and humidity levels.
- Sand and Paint (Optional):
- Once the tiles are completely dry, you can sand them to remove any imperfections or rough edges. Paint and decorate the tiles using acrylic paints and seal them with a clear varnish or sealant.
- Sealing (Optional):
- To make the tiles more resistant to moisture, you can apply a waterproof sealant or varnish.
Keep in mind that these air-dry clay tiles are best suited for decorative purposes, such as wall art or crafts. They may not withstand heavy use or exposure to water as traditional fired ceramic tiles do. For tiles intended for functional areas like kitchens or bathrooms, it’s recommended to invest in professionally fired ceramic tiles made in a kiln.
FAQs
Are air-dry clay tiles as durable as kiln-fired ceramic tiles?
No, air-dry clay tiles are not as durable or water-resistant as kiln-fired ceramic tiles. They are best suited for decorative purposes and may not withstand heavy use or exposure to moisture.
Can I use air-dry clay tiles in areas with high humidity, like bathrooms?
It’s not recommended to use air-dry clay tiles in high-humidity areas because they can absorb moisture and become brittle over time.
How long does it take for air-dry clay tiles to dry completely?
Drying times can vary depending on the thickness of the tiles and the humidity level in your environment. It may take several days to a week or more for them to fully dry.
Can I paint and decorate air-dry clay tiles?
Yes, you can paint and decorate air-dry clay tiles using acrylic paints and sealants. Decorating allows you to add your personal touch and creativity to the tiles.
Are there any alternatives to kiln-firing for making durable ceramic tiles?
While kiln-firing is the most reliable method for creating durable ceramic tiles, some commercial clay products claim to be air-hardening and more durable. However, their performance may still not match that of kiln-fired ceramics.
Can I use air-dry clay tiles for mosaic projects?
Yes, air-dry clay tiles are suitable for mosaic projects and crafts. Their lightweight nature makes them easy to work with for decorative designs.
Are there specific sealants I should use to make air-dry clay tiles more water-resistant?
Look for clear, waterproof sealants or varnishes suitable for use on clay and ceramics. These can help improve the water resistance of your air-dry clay tiles.
Keep in mind that while air-dry clay tiles offer creative possibilities, they are not a replacement for traditional kiln-fired ceramic tiles when it comes to durability and functionality.
Conclusion
Creating ceramic tiles without a kiln is an exciting journey into the world of artistic expression and craft. While these air-dry clay tiles may not possess the same durability and functionality as their kiln-fired counterparts, they open up a realm of possibilities for decorative and artistic projects.
In this guide, we’ve delved into the process of making ceramic tiles without a kiln, from shaping and decorating the clay to the drying and sealing stages. These tiles offer a canvas for your creativity, allowing you to craft unique pieces of art, mosaic designs, or decorative accents.
However, it’s crucial to remember that these tiles are best suited for decorative purposes and may not withstand heavy use or exposure to moisture. For functional tiles intended for areas like kitchens or bathrooms, kiln-fired ceramic tiles remain the reliable choice.
So, gather your air-dry clay, let your imagination run wild, and embark on a creative journey where the possibilities are limited only by your artistic vision.