Ceramic bowls, cherished for their beauty and functionality, have long been a staple in households around the world. Their delicate craftsmanship and artistic designs make them prized possessions. However, despite their durability, ceramic bowls are not immune to accidents, and they are susceptible to breakage.
In this guide, we will delve into the art of repairing a ceramic bowl, emphasizing the significance of learning this skill rather than disposing of these valuable pieces. By mastering the techniques of ceramic bowl repair, you can not only restore their functionality but also preserve their sentimental and aesthetic value for years to come. Join us on this journey of restoration and appreciation for these timeless kitchen treasures.
Can chipped ceramic bowls be repaired?
Yes, chipped ceramic bowls can indeed be repaired. Repairing a chipped ceramic bowl typically involves using epoxy adhesive designed for ceramics. By carefully applying and bonding the broken pieces, you can restore the bowl’s functionality and, to some extent, its appearance.
While the repair may not be entirely invisible, it can significantly extend the life of the bowl, allowing you to continue using and appreciating it. The key to a successful repair is following the correct steps, ensuring a strong bond, and allowing the adhesive to cure properly.
Method Using A2 dash part epoxy
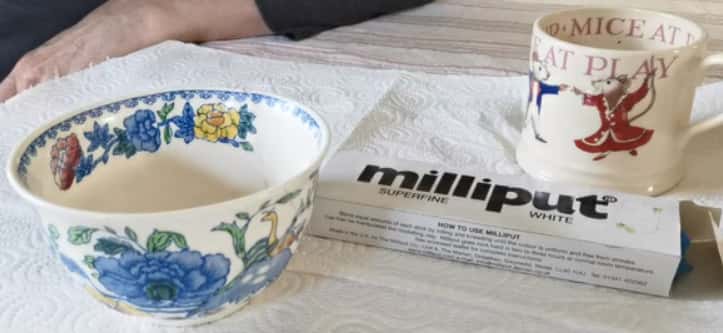
Take a bucket: Prepare to repair a ceramic bowl
Take a bucket and fill one gallon off sand, which will work as a Holder. It is unnecessary for all the equipment, but it is necessary for the cracks that develop on some angle. It will make you enable to use both your hands to clear up the repairs.
In case you lack the sand, then you can have the same exactly using rice.
Must use deep pottery to hold the sand like you should use a deep plate, a shallow serving dish, or a large pot. Read more, KitchenAid ceramic bowl reviews.
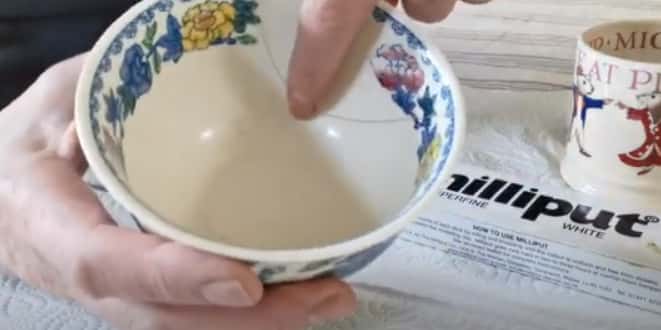
Identification of broken edge:
Identify the place from where your ceramic bowl was broken. The broken area will have ridges that need to be smooth, so use sandpaper to rub on that area. Back and forth motion will put equal pressure on the edges and keep practicing until the edges are smooth.
If you are fixing a crack on your stomach bowels instead of a complete break, you don’t have to use sandpaper anymore. Step we use alcohol and cotton balls. Clean all the pieces that are broken with denatured or 90% alcohol and cotton balls. Completely wipe the edges from the broken pottery and also from the main part using alcohol and cotton balls. Once you have done wiping, leave both surfaces to dry before moving on to the next step. This process is necessary as it will provide better attachment for adhesive. Check here, how to cook with a ceramic pan?
Mixing the adhesives to fix a ceramic bowl
Take two parts of epoxy adhesives in a nonporous sheet, and mix them up using a wooden or plastic stick. Quickly mix them instead of doing this slowly. Be alert because if you fail in mixing, it’ll be hardened in a3 or 4 minutes. Now, fill up the crack in a ceramic bowl to re-attach.
In the market, a variety of epoxy is present. Some of them come along the syringes. Syringes ensure the quick and proper distribution of epoxies on the broken part. In case you lack the syringe, be sure to use the stick and use eyes for equal distribution.
Many people commit the mistake of using glue as a binder for ceramic cracks. Such type of cracks is irreparable with glue, as glue sticks them up. It no longer gives attachment to ceramic bowls, and it gets to break in the future too.
Attaching the broken edges:
As mentioned before, take a wooden stick or a plastic stick to spread the epoxy over broken ends. Dot get afraid of the overflow of that epoxy over edges as you can remove it later on. Additionally, if you are dealing with cracks instead of breaking, you must use a toothpick. A toothpick will push the epoxy deep into the cracks. Any other tool can’t perform this job better than a toothpick. After putting the epoxy, squeeze both pieces together tightly. People also search, how to make ceramic pan nonstick?
Pressing the edges:
Hard press the broken pieces together firmly. Apply more pressure as you can to squeeze them off. Don’t immediately release the vessel on squeezing because the epoxy takes some time to get attached permanently. So, you must wait for some time and don’t show hurry. Try getting in line and keep holding it. Many people ask about the holding time for epoxy. Well, it relies on the type of epoxy, as instructed. At least squeeze it for at least 30 seconds.
Wear protection:
Just don’t worry about the adhesive that can stick with your hands. It is removable and if you are extra conscious, use gloves while working or dealing with adhesives. Ceramic bowls can develop many cracks in different places. If you intend to fill the cracks, don’t do it all at once, and instead, try one by one. Sometimes, a situation arises when both pieces don’t get stick together. In such conditions, you can take a piece of molding clay to pinch the edges together.
Remove the adhesives from sides:
Take a sharp razor, sharp enough to scrap all the epoxy from the surface. Repairing of the bowl is almost on completion. The epoxy presents an odd view when it comes out of the cracks and requires cleaning. Take a razor and clean it up. I don’t have any razor, so take a blade and clean it up. A sharp knife is also a better option.
But before removing the epoxy, make sure that it has set in its place very well. It has dried between the cracks completely. Setting time is different for different epoxies. Even some take hours to set completely. And once you have confirmed its dryness, run a blade along the surface.
Most of the epoxies that are in the market take 20 to 30 minutes. Still, it’s better to follow the instructions given.
Using the sand:
Before finishing, there comes a step to smooth the surface of the ceramic bowl. The cracks we just filled aren’t smooth yet as epoxy is used here. The surface is lacking a smooth layout and looks odd. Fix the rough appearance using sand. Rub the sand over cracks, and it will take away the roughness and ensuring there are no bumps over the surface.
Confirm the surface by rubbing your thumb over the ceramic surface. Fingers have a lot Of sensitive ending from the brain and can detect the settings very well.
Coloring the ceramic bowl: The last step for fixing bowl
It is the final step to painting the cracks. Painting the crack will entirely make it new. Choose the paint exactly similar to the paint already installed. Moreover, if your cracks are visible, you must use acrylic paint for this purpose. Try mixing the colors to get the color that matches your ceramic bowl’s color. Enjoy using the spray of color if another surface of the bowl is shiny and you want to have cracks less noticeable. In the end, we hope how to repair a ceramic bowl article helped you out.
Best Way to Repair a Ceramic Bowl
Repairing a cracked or chipped ceramic bowl can be a satisfying and practical skill. Here’s a step-by-step guide to help you bring your beloved ceramic bowl back to life:
Materials and Tools You’ll Need:
- Epoxy adhesive suitable for ceramics
- Disposable gloves
- Wooden toothpicks or craft sticks
- A clean, damp cloth
- Fine-grit sandpaper (optional)
- Acetone (optional for cleaning)
Safety First: Put on disposable gloves to protect your hands while working with epoxy.
Clean the Bowl (Optional): If the ceramic bowl has any dirt or residue, clean it with a damp cloth. For stubborn stains, you can use a small amount of acetone, but be sure to rinse and dry it thoroughly afterward.
Mix the Epoxy: Follow the instructions on the epoxy adhesive packaging to mix the two components thoroughly. Typically, this involves squeezing out equal amounts of resin and hardener and stirring them together.
Apply the Epoxy: Using a toothpick or craft stick, apply a thin layer of the mixed epoxy to both sides of the crack or chip. Make sure to spread it evenly and cover the entire area that needs repair.
Press the Pieces Together: Gently press the broken pieces of the ceramic bowl together. Hold them firmly for a few minutes to ensure a strong bond.
Wipe Off Excess Epoxy
Carefully wipe off any excess epoxy that squeezes out from the crack or chip while pressing the pieces together. Use a clean cloth or a cotton swab dampened with acetone if necessary.
Allow the Epoxy to Cure: Set the repaired ceramic bowl aside and let the epoxy cure according to the manufacturer’s instructions. This usually takes a few hours to a full day, depending on the type of epoxy used.
Sand (Optional): If there are any rough edges or visible excess epoxy, you can sand them down with fine-grit sandpaper once the epoxy has fully cured.
Wash and Use: After the epoxy has completely cured and any sanding is done, wash the ceramic bowl thoroughly with soap and water. Your repaired bowl is now ready to use.
Remember that while repairing a ceramic bowl can extend its life and functionality, it may not restore its original appearance completely. However, with care and attention to detail, you can salvage a cherished piece of pottery and continue to enjoy its utility and sentimental value.
How to repair a cracked ceramic bowl
Repairing a cracked ceramic bowl is feasible with the right approach. Follow these steps:
- Gather Materials: You’ll need epoxy adhesive suitable for ceramics, disposable gloves, wooden toothpicks or craft sticks, a clean cloth, fine-grit sandpaper (optional), and acetone for cleaning (optional).
- Clean and Prep: If the bowl has dirt or residue, clean it with a damp cloth and optional acetone. Allow it to dry.
- Mix Epoxy: Follow epoxy adhesive instructions to mix and activate it.
- Apply Epoxy: Spread a thin layer of epoxy on both sides of the crack.
- Press Together: Carefully align and press the cracked pieces together.
- Wipe Excess Epoxy: Remove any squeezed-out epoxy and let it cure following epoxy instructions.
- Sand (Optional): If needed, sand any rough edges.
- Wash and Use: After curing, wash the bowl and use it as before.
How to repair a chipped ceramic bowl
Repairing a chipped ceramic bowl is possible and can help extend its life. Here’s how:
Materials You’ll Need:
- Epoxy adhesive suitable for ceramics
- Disposable gloves
- Wooden toothpicks or craft sticks
- A clean, damp cloth
- Fine-grit sandpaper (optional)
- Acetone (optional for cleaning)
Step-by-Step Repair:
- Safety Precautions: Wear disposable gloves to protect your hands.
- Clean the Bowl (Optional): If the ceramic bowl is dirty, clean it with a damp cloth. Stubborn stains can be removed with a small amount of acetone. Rinse and dry thoroughly.
- Mix the Epoxy: Follow the epoxy adhesive instructions to mix both components thoroughly.
- Apply the Epoxy: Use a toothpick or craft stick to apply a thin layer of mixed epoxy to the chipped area, covering it completely.
- Reattach the Chip: Carefully press the chipped piece back into place. Hold it firmly for a few minutes to ensure a strong bond.
- Remove Excess Epoxy: Wipe away any excess epoxy that squeezes out during reattachment.
- Curing Time: Let the epoxy cure according to the manufacturer’s instructions, usually taking several hours to a day.
- Optional Sanding: After curing, if there are rough edges or excess epoxy, lightly sand them with fine-grit sandpaper.
- Wash and Use: Wash the bowl with soap and water once the epoxy is completely cured. Your repaired ceramic bowl is now ready to use.
While the repair may not be entirely invisible, it can restore functionality, allowing you to continue using your cherished ceramic bowl.
How to repair a broken ceramic bowl
Repairing a broken ceramic bowl can be a bit more challenging than fixing a chip or crack, but it’s still possible with the right approach. Here’s how to repair a broken ceramic bowl:
Materials You’ll Need:
- Epoxy adhesive suitable for ceramics
- Disposable gloves
- Wooden toothpicks or craft sticks
- Clamps (if needed)
- A clean, damp cloth
- Fine-grit sandpaper (optional)
- Acetone (optional for cleaning)
Step-by-Step Repair:
- Safety First: Wear disposable gloves to protect your hands.
- Clean and Prep (Optional): If the ceramic bowl is dirty, clean it with a damp cloth. Stubborn stains can be removed with a small amount of acetone. Rinse and dry thoroughly.
- Mix the Epoxy: Follow the epoxy adhesive instructions to mix both components thoroughly.
- Apply the Epoxy: Using a toothpick or craft stick, apply epoxy to the broken edges of the ceramic pieces.
- Reassemble the Bowl: Carefully align and join the broken pieces. Hold them in place firmly. If necessary, use clamps to secure the pieces while the epoxy cures.
- Remove Excess Epoxy: Wipe away any squeezed-out epoxy.
- Curing Time: Allow the epoxy to cure per the manufacturer’s instructions, usually taking several hours to a day.
- Optional Sanding: After curing, if there are rough edges or excess epoxy, you can lightly sand them with fine-grit sandpaper.
- Wash and Use: Wash the repaired ceramic bowl with soap and water once the epoxy is completely cured. Your repaired bowl is now ready to use.
While the repair may not be entirely invisible, it can restore functionality, allowing you to continue using your beloved ceramic bowl.
FAQs
Can I repair a ceramic bowl that’s in multiple pieces?
Yes, you can repair a ceramic bowl that’s broken into multiple pieces using epoxy adhesive. Follow the same steps for repairing a broken ceramic bowl, ensuring proper alignment and a strong bond.
Is it safe to use a repaired ceramic bowl for food?
Yes, it’s safe to use a properly repaired ceramic bowl for food. Once the epoxy has fully cured and the bowl has been cleaned, it can be used just like before.
Will the repair be visible?
The visibility of the repair depends on the quality of the repair job and the type of epoxy used. While it may not be entirely invisible, a well-executed repair can be quite discreet.
Can I repair a ceramic bowl that’s missing a piece?
Repairing a ceramic bowl that’s missing a piece can be more challenging. It’s best to have all the pieces for a successful repair. If a piece is missing, consider using food-safe epoxy to bond any remaining fragments and make it a decorative piece rather than a functional one.
How strong is the bond after repair?
When done correctly, the bond created by epoxy adhesive for ceramic repairs can be strong and durable, allowing you to use the bowl for its intended purpose.
Can I put a repaired ceramic bowl in the dishwasher?
While some epoxy adhesives claim to be dishwasher safe, it’s generally recommended to hand wash repaired ceramic bowls to prolong the repair’s lifespan.
Can I repair decorative ceramic bowls or dishes with the same method?
Yes, the same method can be used to repair decorative ceramic bowls or dishes. Just ensure that the epoxy used is suitable for ceramic materials.
Can I paint over the repaired area to make it less visible?
Yes, you can paint over the repaired area with ceramic-safe paint to make the repair less noticeable. Be sure to use paint designed for use with ceramics and follow the manufacturer’s instructions.
Is it worth repairing a ceramic bowl with sentimental value even if it’s not perfect after repair?
Absolutely. Repairing a ceramic bowl with sentimental value can preserve its memories and functionality, even if the repair isn’t perfect. The imperfections can add character and uniqueness to the piece.
How long does the epoxy take to fully cure?
The curing time for epoxy adhesive can vary depending on the brand and type. It can take anywhere from a few hours to a full day. Be sure to follow the manufacturer’s instructions for the specific epoxy you are using.
Repairing a ceramic bowl can be a rewarding endeavor, and these FAQs provide essential information to help you successfully restore and enjoy your cherished pottery.
Conclusion
In the world of ceramics, the beauty of a beloved bowl can transcend generations, making it more than just a vessel for food; it becomes a cherished heirloom. When a ceramic bowl breaks or chips, the prospect of repair often carries significant sentimental value.
We’ve explored the steps and techniques to restore these cherished pieces to their former glory. Whether it’s a simple chip or a more complex break, the art of ceramic bowl repair offers a chance to preserve both function and sentiment. While the repaired areas may not be entirely invisible, the character and history they carry make them all the more special.
So, the next time you face a broken ceramic bowl, don’t be quick to discard it. Embrace the opportunity to practice this art of repair and continue to savor the joys of sharing meals with a cherished ceramic companion. In doing so, you not only mend ceramics but also mend memories.